Asana is a solid project management tool, and plenty of product teams use it to organize their work. But when it comes to building an actual roadmap, one that reflects what your users want, things get tricky fast. That's where an Asana product roadmap template comes in. It gives you a structured starting point so you're not building your roadmap from scratch every time you spin up a new initiative.
This guide walks you through setting up, customizing, and managing a product roadmap in Asana, step by step. You'll learn how to structure your boards, assign priorities, and keep stakeholders aligned on what's shipping and when. Whether you're a product manager at a startup or part of a larger development team, you'll find practical steps you can apply right away.
One thing worth noting: a roadmap is only as good as the feedback behind it. At Koala Feedback, we help teams collect and prioritize user feedback so roadmap decisions are based on real demand, not guesswork. Pair a well-structured Asana roadmap with solid feedback data, and you've got a product development process that actually works.
An Asana product roadmap template is a pre-built project structure inside Asana that gives your team a ready framework for planning and tracking product development work. Instead of starting with a blank canvas, you get pre-configured sections, fields, and views that map to how real product teams actually organize their plans. Think of it as the skeleton of your roadmap. You fill in the specifics: your features, deadlines, owners, and priorities. The structure is already there waiting for you.
A roadmap template removes the setup friction so your team can focus on actual planning instead of figuring out how to organize the work.
Most Asana product roadmap templates share a common set of building blocks. These components give your roadmap enough structure to be useful without locking you into a format that doesn't fit your team's process. Understanding what each piece does helps you decide what to keep, adjust, or remove when you start customizing.
| Component | What it does |
|---|---|
| Sections or phases | Groups work by time period (Q1, Q2) or theme (Growth, Infrastructure) |
| Tasks and subtasks | Represents features, epics, or individual pieces of work |
| Custom fields | Tracks priority, effort, status, and team ownership |
| Dependencies | Shows which tasks must finish before others can start |
| Timeline view | Visualizes the roadmap as a Gantt-style calendar |
| Portfolio view | Rolls up multiple roadmaps into one executive summary |
Each component works together to give you a complete picture of your product plan in one place. You can see what's coming up, who's responsible, and how individual tasks connect to larger goals without switching between tools or maintaining separate spreadsheets.
A standard Asana project tracks tasks and deadlines. A product roadmap template goes further by adding strategic context to each piece of work. Where a task list might say "build login page by Friday," a roadmap tells you why that task matters, which initiative it belongs to, and how it connects to a quarterly goal. That layer of context is what transforms a to-do list into a planning tool your whole organization can actually use.
The other key difference is audience and communication. A task list is an internal working document for the team doing the work. A roadmap is something you share with stakeholders, executives, and sometimes your users. Asana's roadmap templates account for this by including views and sharing settings that make the plan readable for people who don't work inside Asana every day. That distinction matters when you need to keep leadership aligned on priorities without pulling them into every task-level detail.
Building a roadmap structure from scratch takes time, and it often leads to inconsistency across teams. One team organizes by quarter, another by feature area, and a third by priority tier. Templates create a shared starting point that reduces that fragmentation. When everyone on your product team works from the same base structure, it becomes easier to roll up multiple roadmaps, compare progress across initiatives, and onboard new team members without a lengthy explanation of how things are organized. The time you save on setup goes directly into the work that actually moves your product forward.
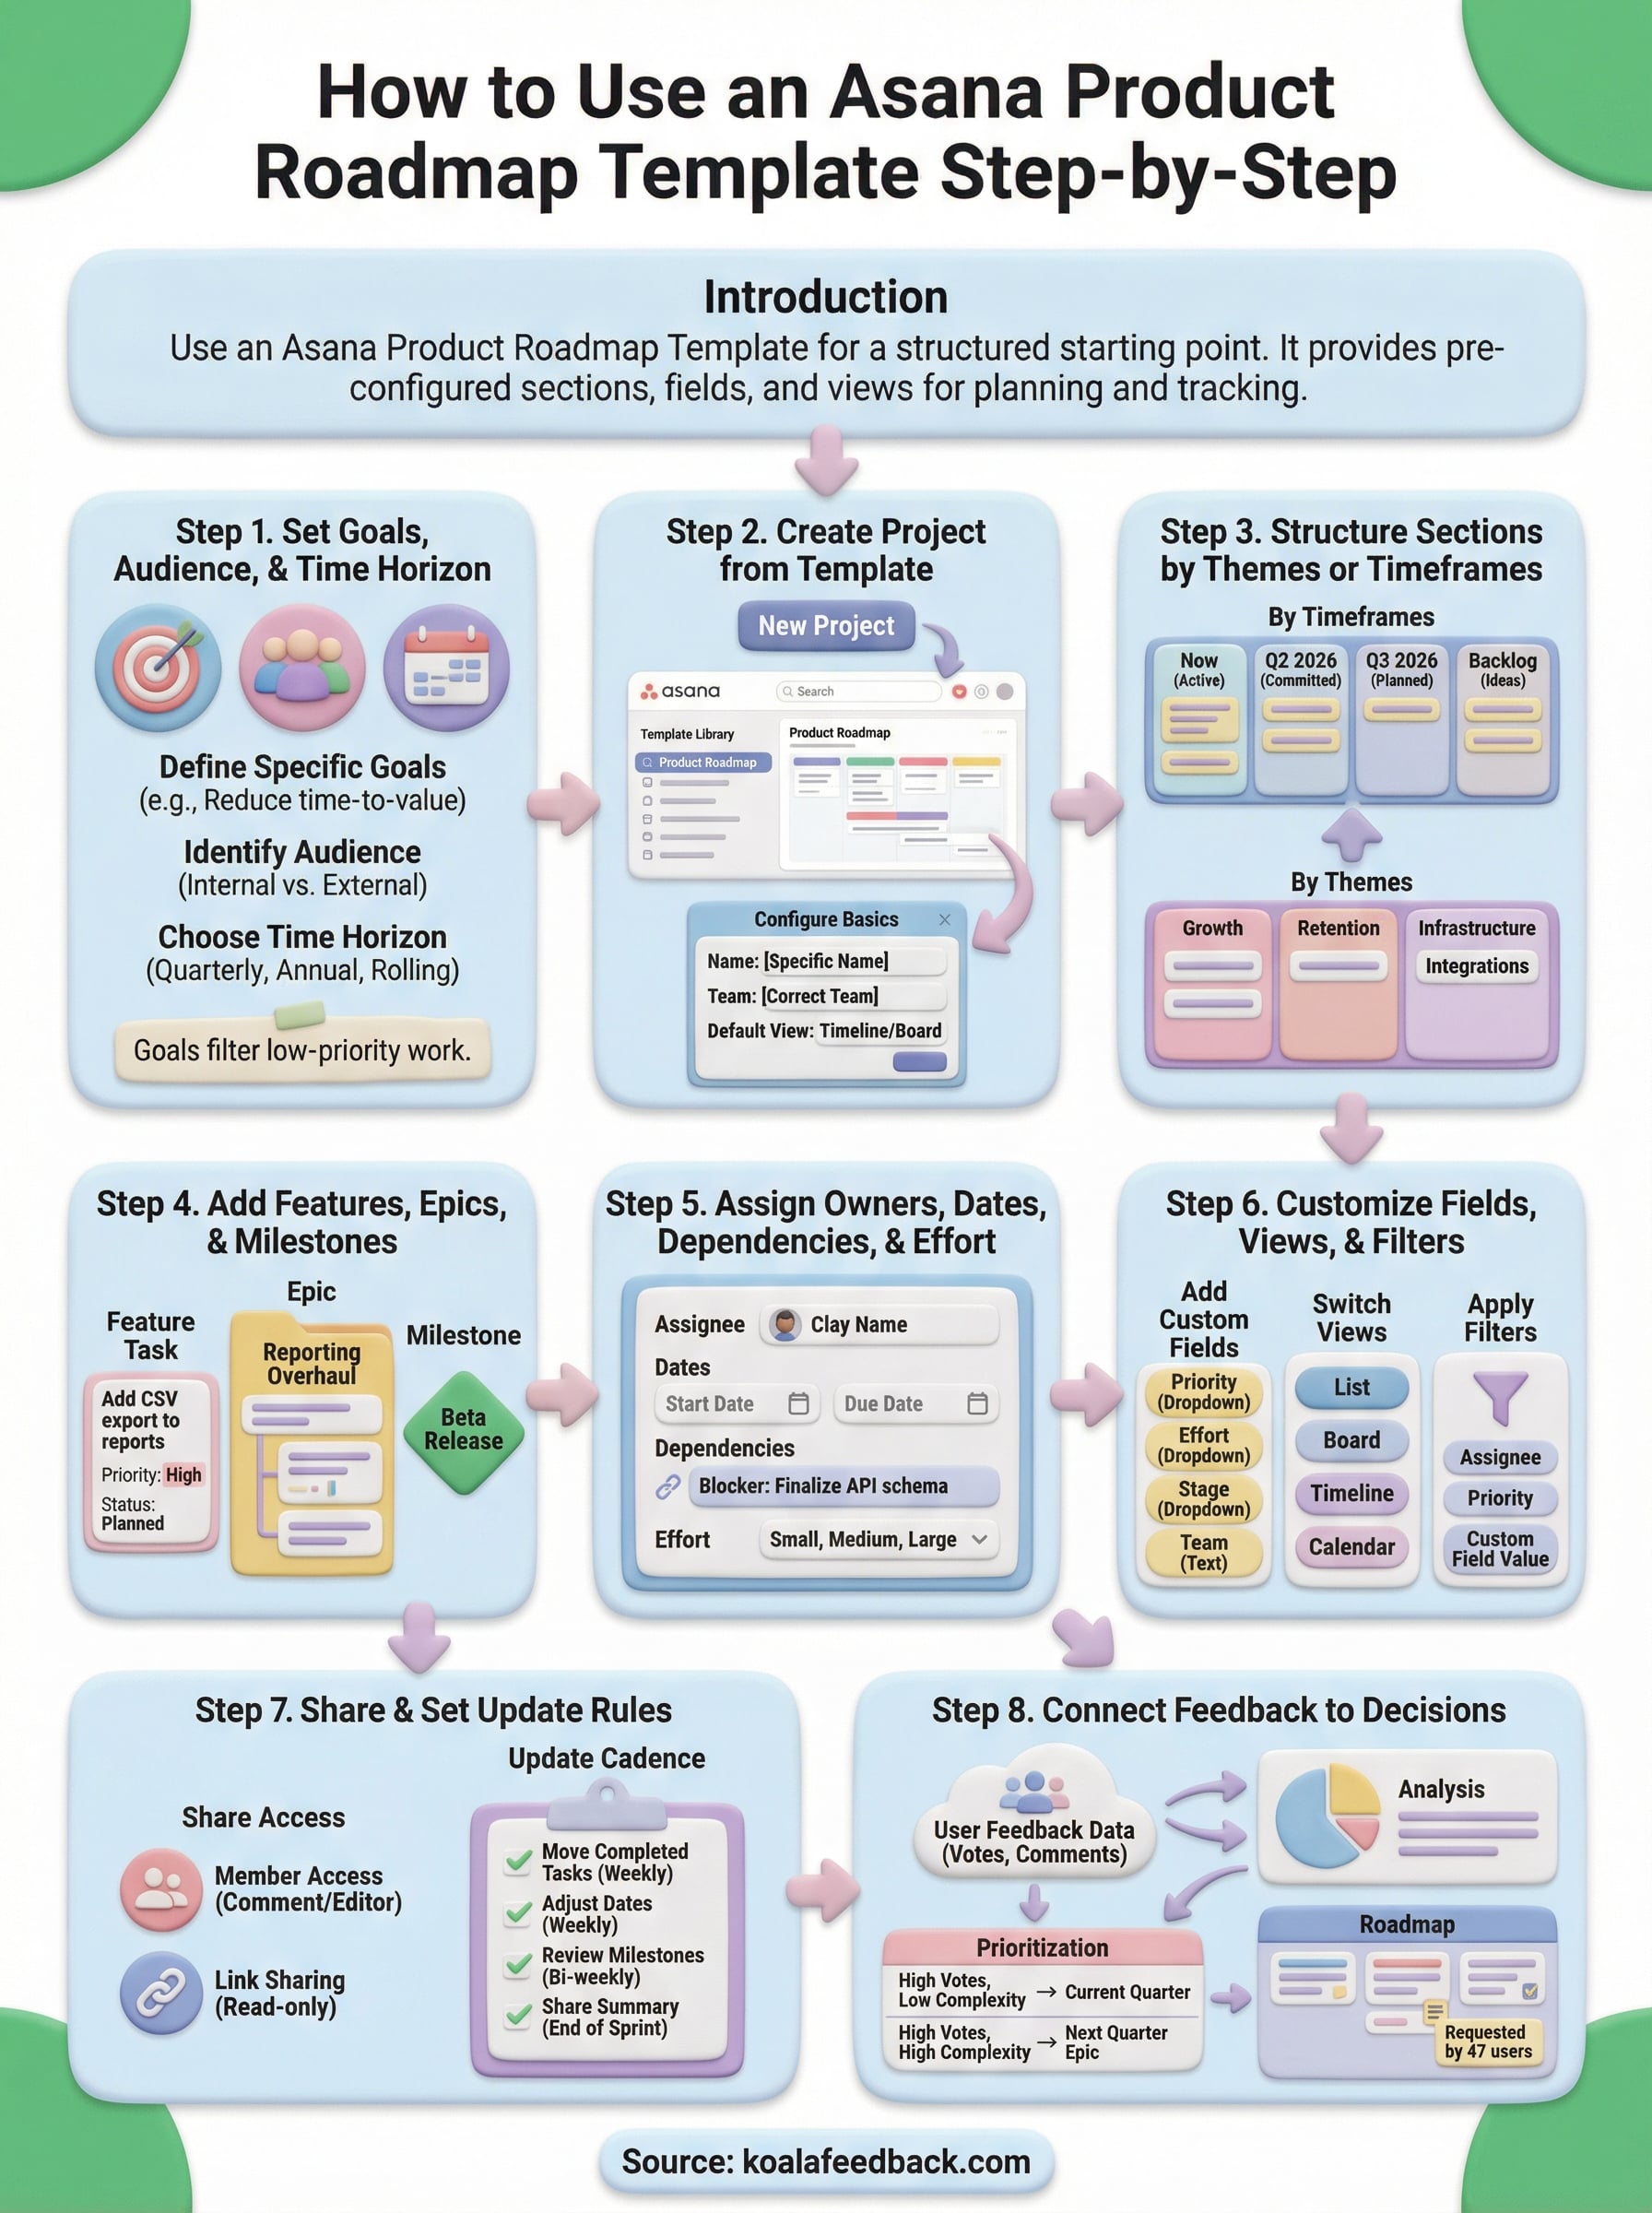
Before you open Asana or touch any asana product roadmap template, you need to answer three questions: What are you trying to accomplish, who will read this roadmap, and how far out does it need to look? Skipping this step leads to a roadmap that looks organized but doesn't actually guide decisions. These three inputs shape every configuration choice you'll make in the steps that follow.
Your roadmap goals connect individual features and tasks to the outcomes your business is trying to hit. A goal is not "ship the onboarding flow." A goal is "reduce time-to-value for new users by 30% in Q2." When your goal is specific and measurable, you can look at any task on your roadmap and ask whether it moves that number. If it doesn't, it probably doesn't belong on the roadmap yet.
Write down one to three goals before you configure anything in Asana. Keep them outcome-focused, not output-focused.
Your roadmap goals act as the filter that keeps low-priority work off the board and your team focused on what actually moves the product forward.
Who reads your roadmap changes how you build it. An internal roadmap for your engineering team needs task-level detail, effort estimates, and dependencies. A roadmap shared with executives needs strategic context and clear milestones without every technical subtask attached. Some teams maintain two versions: one detailed, one summary. Decide upfront which audience you're building for so you configure the right fields and views from the start.
Most product roadmaps fall into one of three ranges: quarterly (3 months), annual (12 months), or rolling (always showing the next 6 months regardless of calendar date). Quarterly roadmaps work well for fast-moving teams where priorities shift often. Annual roadmaps suit teams that need to align with budget cycles or long-term strategic plans. A rolling roadmap gives you flexibility without losing forward visibility. Pick the one that matches how your team actually plans and commit to it before moving to Step 2.
With your goals, audience, and time horizon locked in, you're ready to build inside Asana. The platform gives you a built-in template library that includes a dedicated product roadmap option. Using it saves significant setup time and ensures you start with a proven structure instead of improvising one under pressure.
Log into Asana and click the "New Project" button from your left sidebar or home screen. A dialog box will appear giving you the option to start from a blank project or use a template. Select "Use a template" and type "roadmap" into the search bar. Asana will surface several options. The one you want is labeled "Product Roadmap" under the product management category. Click it to preview the structure before committing.
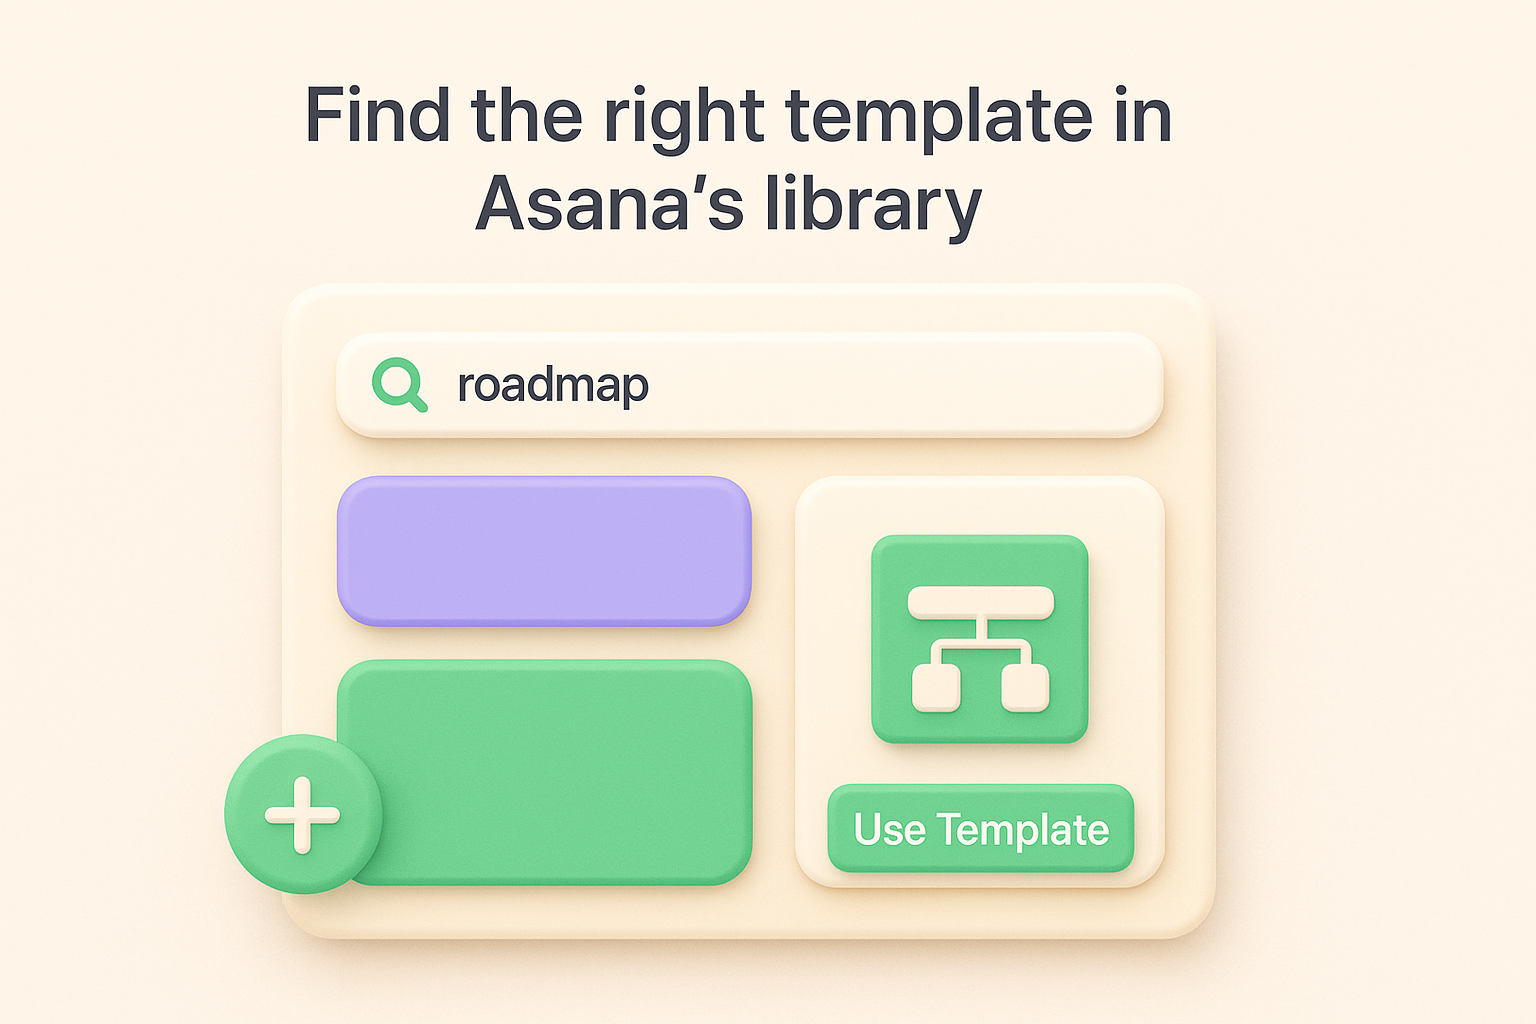
Reviewing the template preview before creating the project lets you confirm the default layout matches your planning style without having to undo changes later.
Once you confirm the preview looks right, click "Use Template." Asana will prompt you to name the project, assign it to a team, and set its privacy level. Name it something specific, like "Q2 2026 Product Roadmap," rather than a generic label. Assign it to the correct team so the right people get automatic access without a manual permissions step later.
After Asana creates the project, you land inside it with the default template structure already in place. Before you add any real content, take two minutes to set the project-level defaults. Open the project settings by clicking the three-dot menu at the top right of the project view. Set the default view to Timeline if your team plans around dates, or Board if you prefer a status-based layout. You can switch views at any time, but picking one default keeps things consistent for collaborators who open the project for the first time. This small configuration step is part of what makes an asana product roadmap template more useful than a blank project: the foundation is already sensible, and you're just tuning it to your specific context.
Once your project is created from the Asana product roadmap template, the next decision is how to organize your sections. You have two main options: structure by timeframes (Q1, Q2, H1) or structure by themes (Growth, Reliability, User Experience). The choice you make here determines how stakeholders read your roadmap and how your team prioritizes day-to-day work.
Timeframe sections work best when your team plans around quarterly cycles or fixed release windows. Each section becomes a bucket for work that ships within that period, making it easy to see what's due when and whether your team is overloaded in any given quarter.
Here is a simple timeframe structure you can apply directly inside your Asana project:
| Section name | Time range | Use case |
|---|---|---|
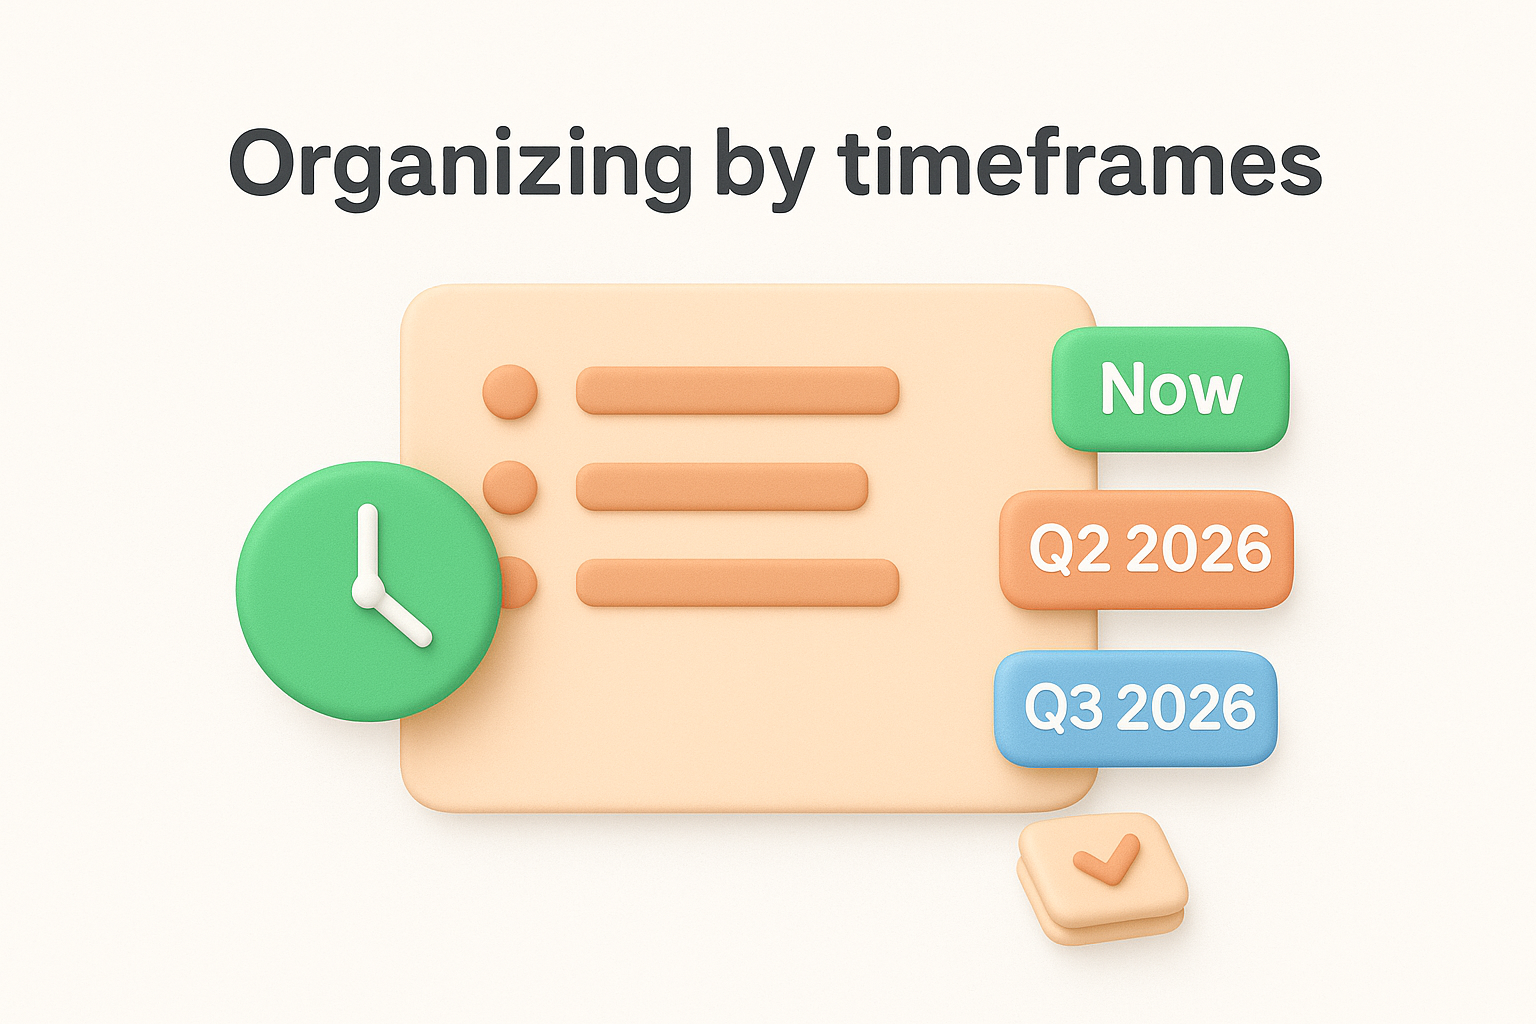
| Now | Current sprint or month | Work actively in progress |
| Q2 2026 | April - June 2026 | Committed upcoming features |
| Q3 2026 | July - September 2026 | Planned but not yet scoped |
| Backlog | No fixed date | Ideas under consideration |
To add these sections in Asana, click "Add Section" at the bottom of any existing section in your list view and type the section name directly. Repeat for each time bucket.
Theme-based sections work better when your product spans multiple focus areas and you want stakeholders to understand your strategic priorities at a glance rather than just what ships next month. Instead of quarters, your sections map to product pillars.
A theme-based structure might look like this:
Pick themes that match the language your leadership team already uses so the roadmap reads as a strategic document, not just a task tracker.
Within each theme section, you can still use custom date fields to signal timing without making the entire structure calendar-driven. This gives you the clarity of strategic grouping while keeping delivery expectations visible to everyone reading the plan.
With your sections in place, you can start filling your Asana product roadmap template with actual work. This step is where the roadmap goes from structural skeleton to a living plan. You'll add three types of items: features (the individual pieces of functionality), epics (groups of related features), and milestones (fixed points that mark significant progress). Each type serves a different purpose, and using all three gives your roadmap the right level of detail for different audiences.
Features go in as tasks inside the relevant section. To add a task, click "Add Task" at the bottom of any section and type the feature name directly. Keep task names clear and outcome-oriented. "Add CSV export to reports" is better than "Export work" because anyone reading the roadmap knows exactly what it means without a follow-up question.
Use this format when writing feature tasks for consistency across your team:
| Field | Example |
|---|---|
| Task name | Add CSV export to reports |
| Description | One-sentence summary of what it does and why it matters |
| Custom field: Priority | High / Medium / Low |
| Custom field: Status | Planned / In Progress / Complete |
Related features belong inside an epic, which you create in Asana as a parent task with subtasks nested underneath it. For example, an epic called "Reporting Overhaul" might contain subtasks for CSV export, PDF generation, and dashboard filters. This structure lets stakeholders collapse the detail when they want a strategic view and expand it when they need specifics.
To create an epic, add a task at the section level, then click into it and use the "Add Subtask" button to nest individual features beneath it.
Milestones signal that something significant has been reached, like a public launch, a beta release, or the completion of an entire epic. In Asana, you convert any task to a milestone by opening it and selecting "Mark as Milestone" from the task detail panel. Milestones show as diamond shapes on the Timeline view, making them immediately visible to everyone reviewing the roadmap's overall shape.
Use milestones sparingly so they retain their weight as meaningful markers rather than becoming routine checkpoints that lose significance over time.
Your roadmap has features, epics, and milestones, but without ownership and timing attached to each item, it reads as a wish list rather than a plan. This step turns your Asana product roadmap template into an accountable schedule where every task has a named owner, a clear window, and a realistic effort estimate that helps your team avoid overcommitting.
Open any task on your roadmap and click the Assignee field to assign a single owner. Avoid assigning tasks to teams or groups. When everyone owns something, nobody does. Pair each assignment with a start date and due date using the date fields in the task detail panel. Setting both dates (not just the due date) is what populates the Timeline view correctly and lets you see workload distribution across your team at a glance.
One owner per task creates clear accountability and makes it obvious who to ask when priorities shift or blockers appear.
Dependencies tell Asana which tasks must finish before others can start. To set one, open a task, scroll to the "Dependencies" section in the task detail panel, and click "Mark as dependent on." Select the blocking task from the list. Asana will flag the dependent task on your Timeline view with a connecting line, making scheduling conflicts visible before they become real problems.
A common dependency chain in a product roadmap looks like this:
| Blocking task | Dependent task |
|---|---|
| Finalize API schema | Build frontend data layer |
| Complete user research | Write feature spec |
| QA sign-off | Release to production |
Effort estimates help you balance your roadmap across time periods so you don't accidentally pack three months of work into six weeks. Add a custom field called "Effort" with values like Small, Medium, and Large. Open each task and set the effort level based on team input or historical sprint data. Once every task has an effort label, scan each section of your roadmap to confirm the workload is realistic before you commit to any delivery dates.
The default setup in your Asana product roadmap template gets you most of the way there, but the real value comes from tailoring the fields, views, and filters to match how your team actually works. Spending 20 minutes on customization now means everyone reads the roadmap the same way and pulls the same insights without asking you to explain it.
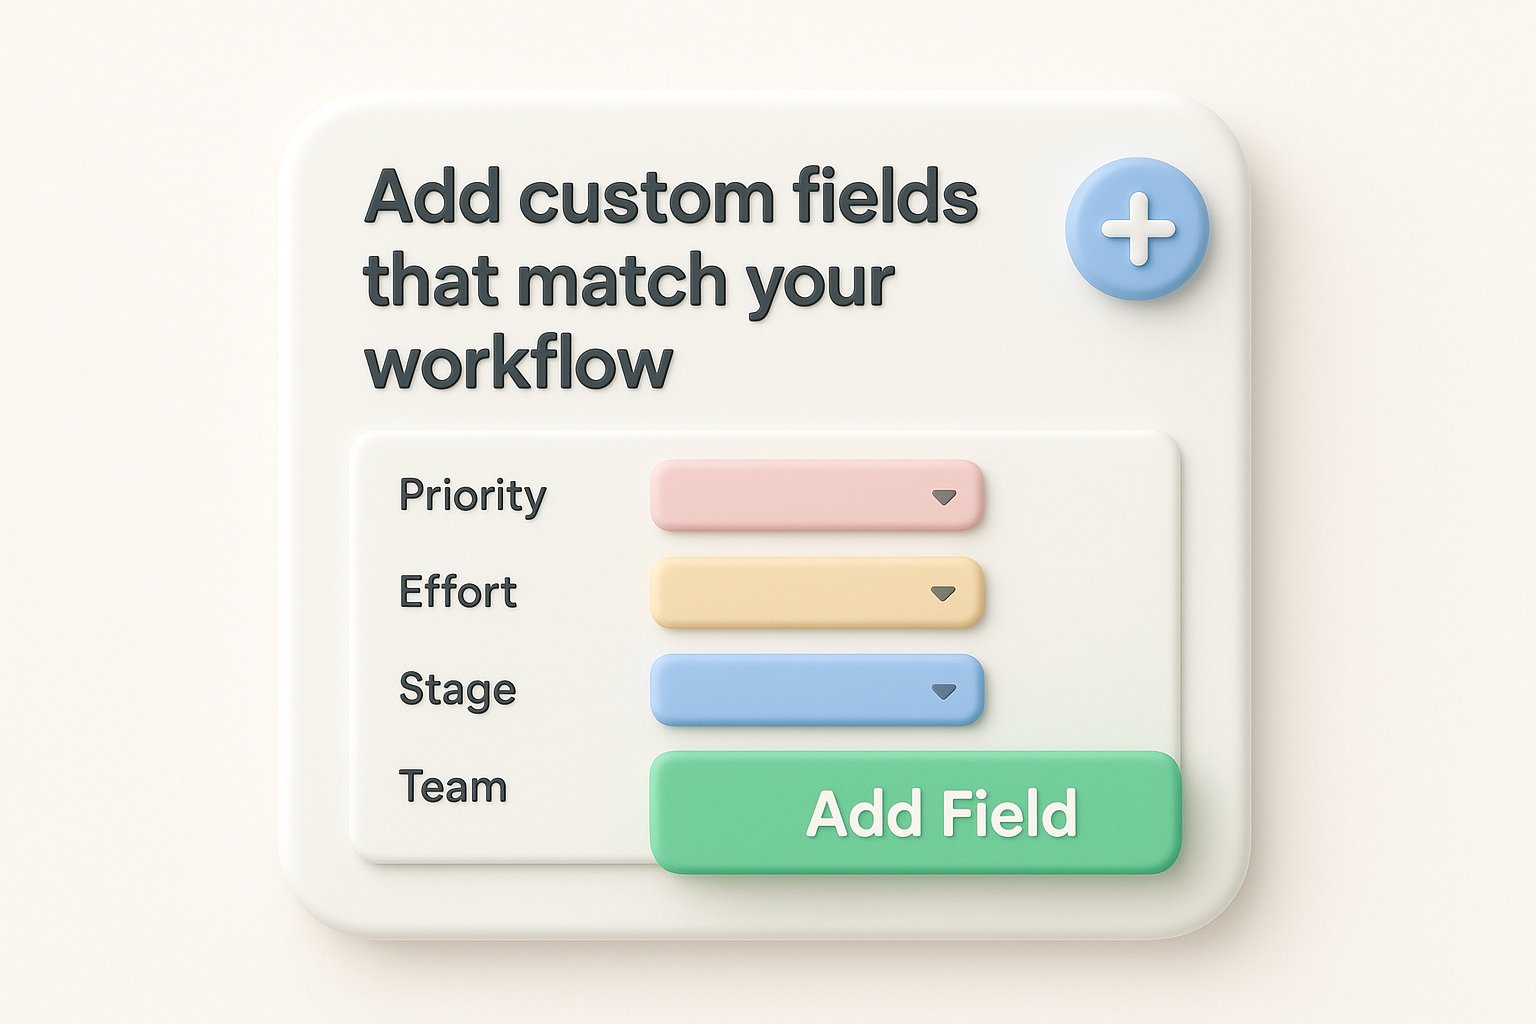
Asana lets you add custom fields to any project through the "Customize" panel on the right side of your project view. Click "Add Field" and choose a field type. For most product roadmaps, four fields cover the majority of what you need.
| Field name | Field type | Suggested values |
|---|---|---|
| Priority | Dropdown | Critical, High, Medium, Low |
| Effort | Dropdown | Small, Medium, Large |
| Stage | Dropdown | Discovery, Scoping, Build, Done |
| Team | Text or People | Engineering, Design, Data |
Once you add these fields, they appear as columns in List view and as data points inside each task detail panel. Fill them in as you review each task on the roadmap so your filters work correctly in the next sub-step.
Asana offers four main views: List, Board, Timeline, and Calendar. Each one surfaces different information, and the right choice depends on who's looking at the roadmap. Use Timeline when presenting to executives or stakeholders who want to see delivery windows and dependencies laid out visually. Use Board when your team runs sprint-style reviews and wants to move items across status columns. Use List when you need to bulk-edit fields or sort by priority quickly.
Pick one view as your default for sharing links externally so every stakeholder lands on the same consistent layout when they open the roadmap.
Filters let you isolate exactly the tasks you need without hiding anything permanently. Click the "Filter" button at the top of your project view and apply conditions by assignee, priority, or custom field value. For example, filter by Priority = Critical before a planning meeting to surface only the work that cannot slip. Save that filter as a named view so you can pull it up again in one click without reconfiguring it each time.
A roadmap nobody can see is just a private document. Once your Asana product roadmap template is configured with real tasks, owners, and dates, the next step is getting it in front of the right people with the right level of access. How you share it and how you keep it current are just as important as how you built it.
Asana gives you two sharing options for any project: member access and link sharing. For internal stakeholders like engineers and designers, add them directly as project members through the "Share" button at the top of the project. Choose between "Comment only" and "Editor" roles so reviewers can ask questions without accidentally moving tasks or changing field values. For executives or external partners who only need a read-only view, use the "Copy project link" option and set the project privacy to "My organization" or "Public to organization" depending on your company's Asana plan.
Giving the wrong person Editor access is how roadmaps get quietly changed without anyone noticing, so match permissions to actual roles before you share any link.
Sharing once is not enough. Roadmaps go stale fast, and outdated information destroys trust faster than having no roadmap at all. Set a recurring update schedule before the roadmap goes live so your team knows exactly when they're expected to refresh task statuses, adjust dates, and close out completed work. A simple update template helps everyone follow the same process without guessing.
Use this update checklist at the start of each week or sprint:
| Update action | Who does it | When |
|---|---|---|
| Move completed tasks to "Done" status | Task owner | Every Monday |
| Adjust dates for delayed items | Task owner | Every Monday |
| Review upcoming milestone accuracy | Product manager | Every two weeks |
| Share roadmap summary to Slack or email | Product manager | End of each sprint |
Setting these rules before anyone starts using the roadmap removes the ambiguity that causes update gaps. Add the checklist as a recurring task inside Asana so it shows up automatically and nobody has to remember to trigger it manually.
Your Asana product roadmap template becomes significantly more valuable when the tasks on it trace back to actual user requests rather than internal assumptions. Without a direct link between user feedback and roadmap priorities, you risk shipping features your team cares about while ignoring the ones your users actually need. This step closes that gap by building a deliberate process for moving validated feedback directly into your roadmap workflow.
Before adding any new feature to your roadmap, check whether real user demand supports it. If you use a dedicated feedback tool like Koala Feedback, you can see which requests have the most votes, comments, and engagement from your actual user base. Export or review that data regularly and use it as your primary input layer when deciding what lands in your next planning cycle.
Letting vote counts and user comments drive your feature list removes the bias that comes from prioritizing whoever spoke to the product team most recently.
A simple scoring approach helps you translate feedback volume into roadmap placement. Use this as a reference when reviewing requests each planning cycle:
| Feedback signal | Action |
|---|---|
| High votes, low complexity | Add to current quarter with high priority |
| High votes, high complexity | Add to next quarter as a scoped epic |
| Low votes, strategic fit | Move to backlog for later review |
| Low votes, no strategic fit | Archive without adding to roadmap |
Once you identify the top-voted requests, match each one to an existing task or create a new task in the relevant roadmap section. Open the Asana task and add a description field note that references the source: for example, "Requested by 47 users via feedback portal, top theme: reporting." This one-line reference connects the delivery work to the demand behind it, which makes prioritization conversations with stakeholders concrete instead of opinion-based. When you can point to user evidence inside each task, every planning meeting runs faster and with less pushback.
Your Asana product roadmap template is only useful if you maintain it consistently after the initial setup. The eight steps in this guide give you a complete framework: clear goals, structured sections, assigned ownership, and a feedback loop that keeps priorities grounded in real user demand. None of that works long-term without a steady habit of reviewing and updating what's on the board.
The teams that get the most out of their roadmaps connect their planning directly to what users are asking for. When you capture, organize, and score feedback before each planning cycle, your roadmap reflects actual needs rather than internal assumptions. That connection between user input and delivery decisions is what separates a plan people trust from one they ignore. If you want a faster way to build that feedback loop, start collecting and prioritizing user feedback with Koala Feedback and bring that data straight into your next roadmap review.

Start today and have your feedback portal up and running in minutes.
