Managing a product roadmap in spreadsheets or scattered documents gets messy fast. A Trello product roadmap template gives you a visual, organized way to plan features and track progress, without starting from scratch.
Here's the thing: setting up Trello for roadmaps requires some thought. You need the right lists, labels, and workflows to make it actually useful. Otherwise, you'll end up with another cluttered board that nobody updates.
This guide walks you through how to set up a Trello product roadmap template step by step. You'll learn how to structure your board, customize it for your workflow, and keep it running smoothly. We'll also cover when Trello works well for roadmaps, and when a dedicated tool like Koala Feedback might serve you better, especially if you need to collect user feedback and prioritize features based on what your users actually want.
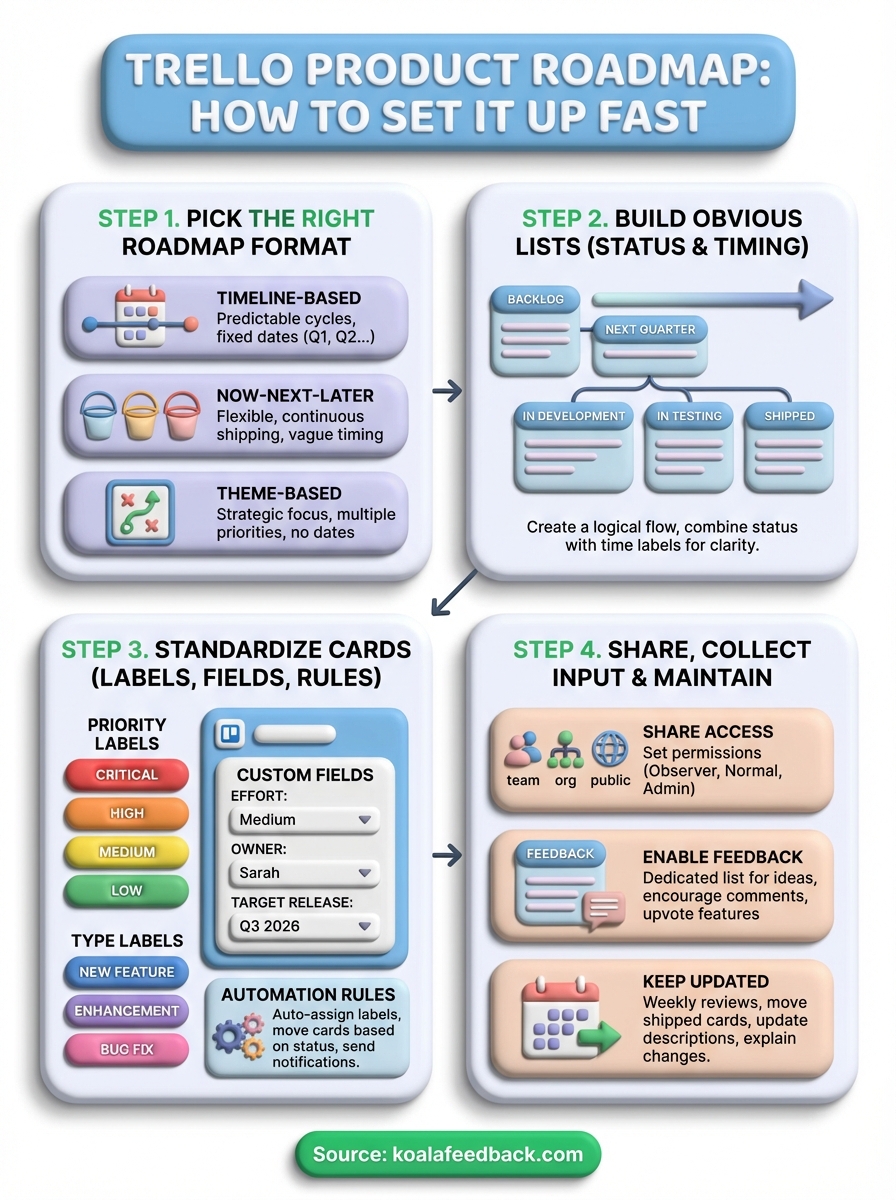
Your roadmap format shapes how stakeholders understand priorities and timing. Before you grab a trello product roadmap template and start building, you need to decide which format matches your team's workflow and communication needs. The wrong format creates confusion about what's coming when, while the right one makes everything obvious at a glance.
Different formats work for different situations. If you're in enterprise software with fixed release dates, you'll need something different than a startup shipping continuously. The format also affects how much pressure you put on yourself to hit specific dates, and how flexible you can be when priorities shift.
Timeline-based roadmaps organize features by specific dates or quarters. You create lists for each time period (Q1 2026, Q2 2026, Q3 2026) and move cards into the matching timeframe. This format works when you have predictable release cycles and need to coordinate with sales, marketing, or external stakeholders who plan around specific dates.
The upside is clarity for everyone outside the product team. Marketing knows when to prepare campaigns, sales knows what to promise customers, and executives can see progress against quarterly goals. You'll want this format if your business model depends on synchronized launches or if you're working toward a major event like a conference.
Timeline roadmaps force commitment to dates, which can backfire when development hits unexpected challenges or priorities change based on user feedback.
The downside is rigidity. Dates create expectations that are hard to walk back, even when you discover a feature needs more work or a higher-priority issue emerges. You end up either shipping incomplete features to hit deadlines or constantly explaining why things moved. This format also encourages date-driven decisions instead of value-driven ones.
Now-next-later roadmaps divide features into three buckets: currently building, building soon, and on the horizon. You create three lists and move cards between them as work progresses. This format gives you flexibility to adjust priorities without revising specific dates every time something changes.
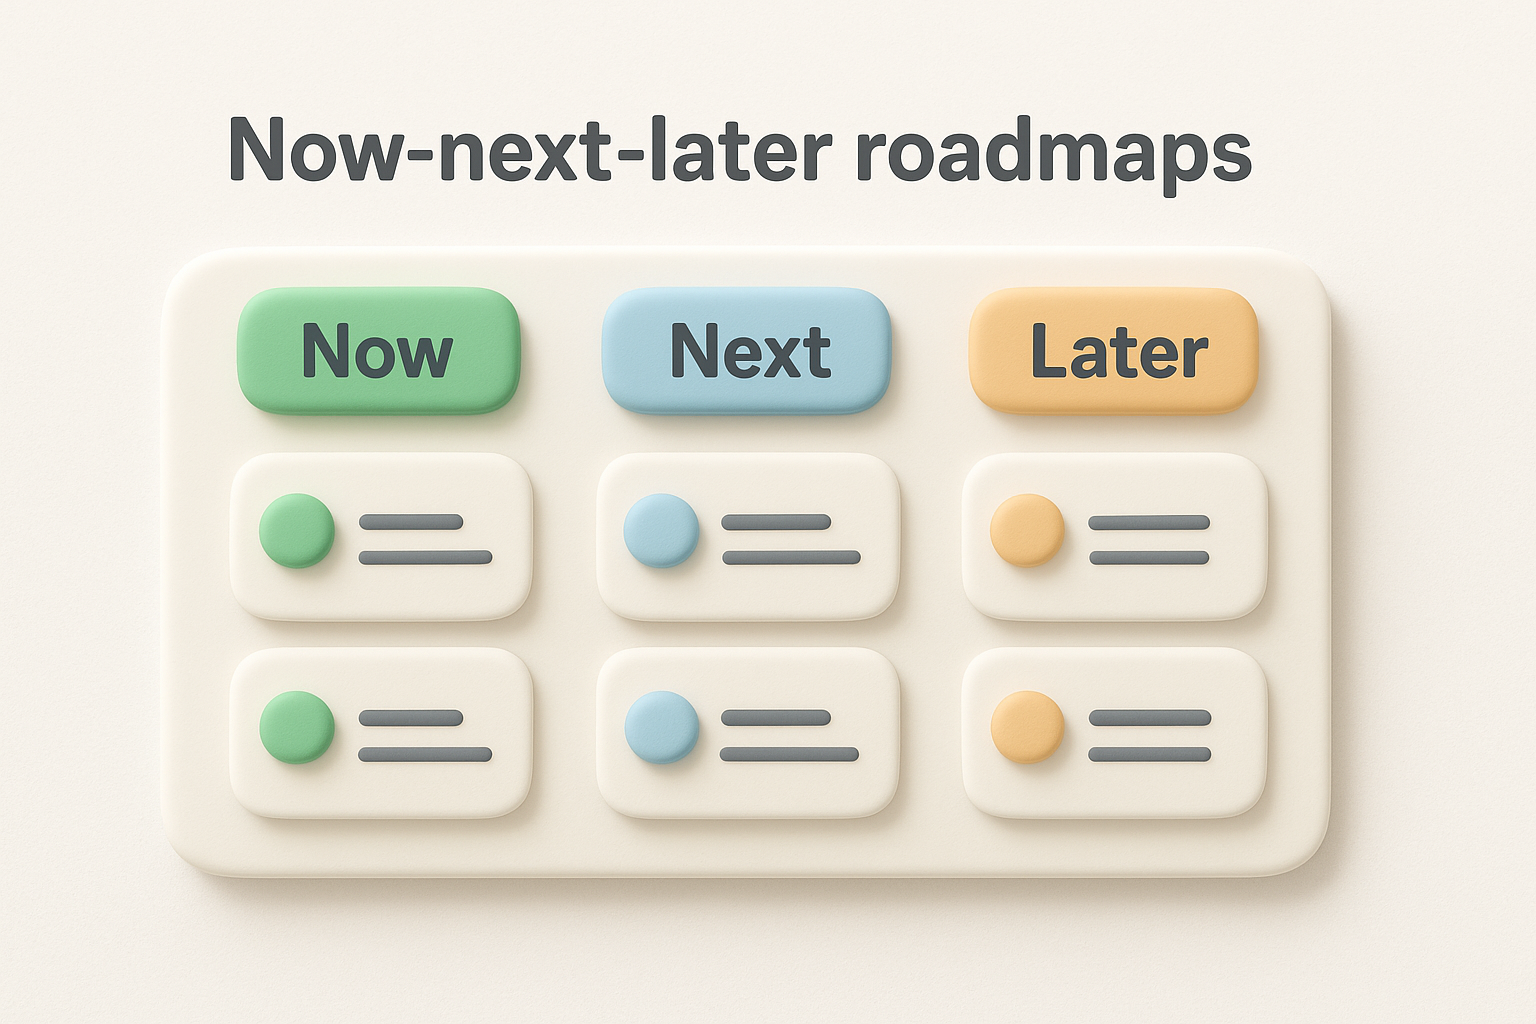
This approach works well for product teams that ship continuously and need to respond quickly to user feedback. You can shift something from "later" to "next" based on customer requests without explaining why you moved a date. The vague timing also prevents stakeholders from treating roadmap items as firm commitments before you've validated the work.
Use this format when your development cycle is fluid, when you're still figuring out product-market fit, or when external factors (like new competitors or market changes) might force priority shifts. It's also better for smaller teams where everyone stays close to the work and doesn't need precise scheduling.
Theme-based roadmaps group features by strategic focus instead of timing. You create lists for each major initiative (Improve Onboarding, Scale Performance, Mobile Experience) and cards represent the features that support each theme. This format helps teams align on strategy rather than getting stuck debating delivery dates.
You'll want this format when you're working on multiple priorities simultaneously or when different team members own different strategic areas. It also works when you need to show how various features connect to business objectives without committing to when each one ships. The roadmap becomes a strategic document rather than a project schedule.
The challenge is that stakeholders often want timing anyway. You can add labels to indicate "this quarter" or "next quarter," but once you do that, you're basically building a hybrid format that combines themes with timelines. Consider whether your audience will accept a roadmap without dates, or if you need to layer timing information on top of the themes.
Starting with a pre-built template saves you hours of setup work. Trello offers built-in roadmap templates that include common lists, example cards, and basic structure, so you don't have to figure out organization from scratch. You can either use Trello's template gallery or build your own board manually if you want complete control over every element.
Navigate to your Trello workspace and click "Create board from template" in the board creation menu. Search for "product roadmap" or "roadmap" in the template gallery, and you'll find several options designed for product planning. These templates typically include pre-configured lists like "Backlog," "Planned," "In Progress," and "Shipped," along with sample cards that show you how to structure feature descriptions.
Pick a template that matches your chosen format from the previous section. If you selected a timeline-based approach, look for templates with quarterly lists. For now-next-later roadmaps, find templates with those three specific columns. Theme-based roadmaps might not have a perfect match, so you'll need to customize more heavily.
Once you select a template, Trello creates a new board with all the structure in place. Delete the sample cards immediately because they're just placeholders, and rename any lists that don't match your terminology. The template gives you a foundation, but you'll still need to adjust it to fit your specific workflow.
Pre-built templates often include features you don't need, so spend a few minutes cleaning up the board before adding real work.
Click "Create new board" and give it a clear name like "Product Roadmap 2026" or "Feature Planning Board." Choose a background color that differentiates this board from your other Trello boards, making it easier to spot when you're switching between tabs. Set the board visibility to match who needs access: team-only, organization-wide, or public.
Add your first lists manually by clicking "Add a list" on the right side of the board. Create the basic structure you identified in your format selection: either time periods, now-next-later columns, or strategic themes. Keep list names short and obvious because long list titles create visual clutter and make it harder to scan the board quickly.
This blank-board approach takes more initial setup time, but you end up with exactly what you need without extra features. You won't waste time deleting sample content or renaming lists that don't match your workflow. Consider starting blank if you're building a trello product roadmap template that your team will clone repeatedly, since you can perfect every detail before anyone else uses it.
Your list structure determines whether people immediately understand what's happening or get confused trying to decode your board. A well-designed trello product roadmap template uses list names that communicate both status and timing without requiring anyone to read card details. When you nail this step, stakeholders can glance at your board and instantly know what's shipping, what's planned, and what's still under consideration.
Pick status labels that everyone on your team already understands and use them consistently across every list. Terms like "Backlog," "Planned," "In Development," "In Review," and "Shipped" work because they describe exactly what's happening with features. Avoid vague names like "Ideas" or "Maybe" because they don't tell you how serious these items are or when they might move forward.
Create a logical flow from left to right that matches how features progress through your development process. Your leftmost list should represent the earliest stage (typically a backlog or intake column), and your rightmost list should show completed work. This arrangement lets you move cards naturally from left to right as work advances, creating a visual representation of progress that anyone can follow.
Here's a status-based structure that works for most product teams:
Combine status terms with time references when you need to communicate both what's happening and when it's happening. Labels like "Q2 2026 - Planned" or "March - In Development" give stakeholders the information they need without opening individual cards. This approach works especially well if you chose a timeline-based format in step one, since the time periods become the primary organizing principle.
Update time-based list titles at the start of each new period to keep your board current. When Q2 2026 ends, rename that list to "Q2 2026 - Completed" and create a fresh "Q3 2026 - Planned" list for incoming work. This archival approach maintains a historical record while keeping active planning focused on relevant time periods.
Lists with both status and timing eliminate the need for stakeholders to dig into cards just to understand basic scheduling information.
Keep your total list count between four and seven to prevent overwhelming anyone who opens the board. More lists create visual clutter and make it harder to scan quickly, while fewer lists force you to cram unrelated items together. Find the balance where each list has a clear, distinct purpose without splitting hairs over minor status differences.
Resist the temptation to create separate lists for every possible state like "Ready for Development," "Blocked," "Waiting for Design," and "Pending Approval." Instead, use card labels or custom fields to track these granular details while keeping your main list structure simple and focused on the big-picture status that matters most to your roadmap audience.
Consistent card formatting turns your trello product roadmap template from a collection of random notes into a structured information system. When every card follows the same pattern, stakeholders can quickly scan and understand features without digging through disorganized descriptions. You need labels for visual categorization, custom fields for structured data, and automation rules to maintain consistency as your roadmap grows.
Click the Labels button in the board menu and set up color-coded categories that communicate essential information at a glance. Create a priority system using colors like red for "Critical," orange for "High," yellow for "Medium," and green for "Low." Add a second set of labels for feature types such as "New Feature," "Enhancement," "Bug Fix," and "Technical Debt" so people immediately understand what kind of work each card represents.
Apply labels consistently to every card you add to the board. When you create a new feature card, assign both a priority label and a type label before moving it into any active list. This discipline prevents confusion later when someone wonders why a card lacks categorization or whether an unlabeled item matters.
Labels create visual patterns across your board that let you spot priorities and feature types without reading individual card titles.
Enable the Custom Fields Power-Up in your board settings and create fields that capture important details without cluttering card descriptions. Add fields like "Effort (Small/Medium/Large)," "Target Release," "Owner," and "Customer Requests" to track information that influences prioritization decisions. These fields appear on card fronts, making critical data visible without opening each card.
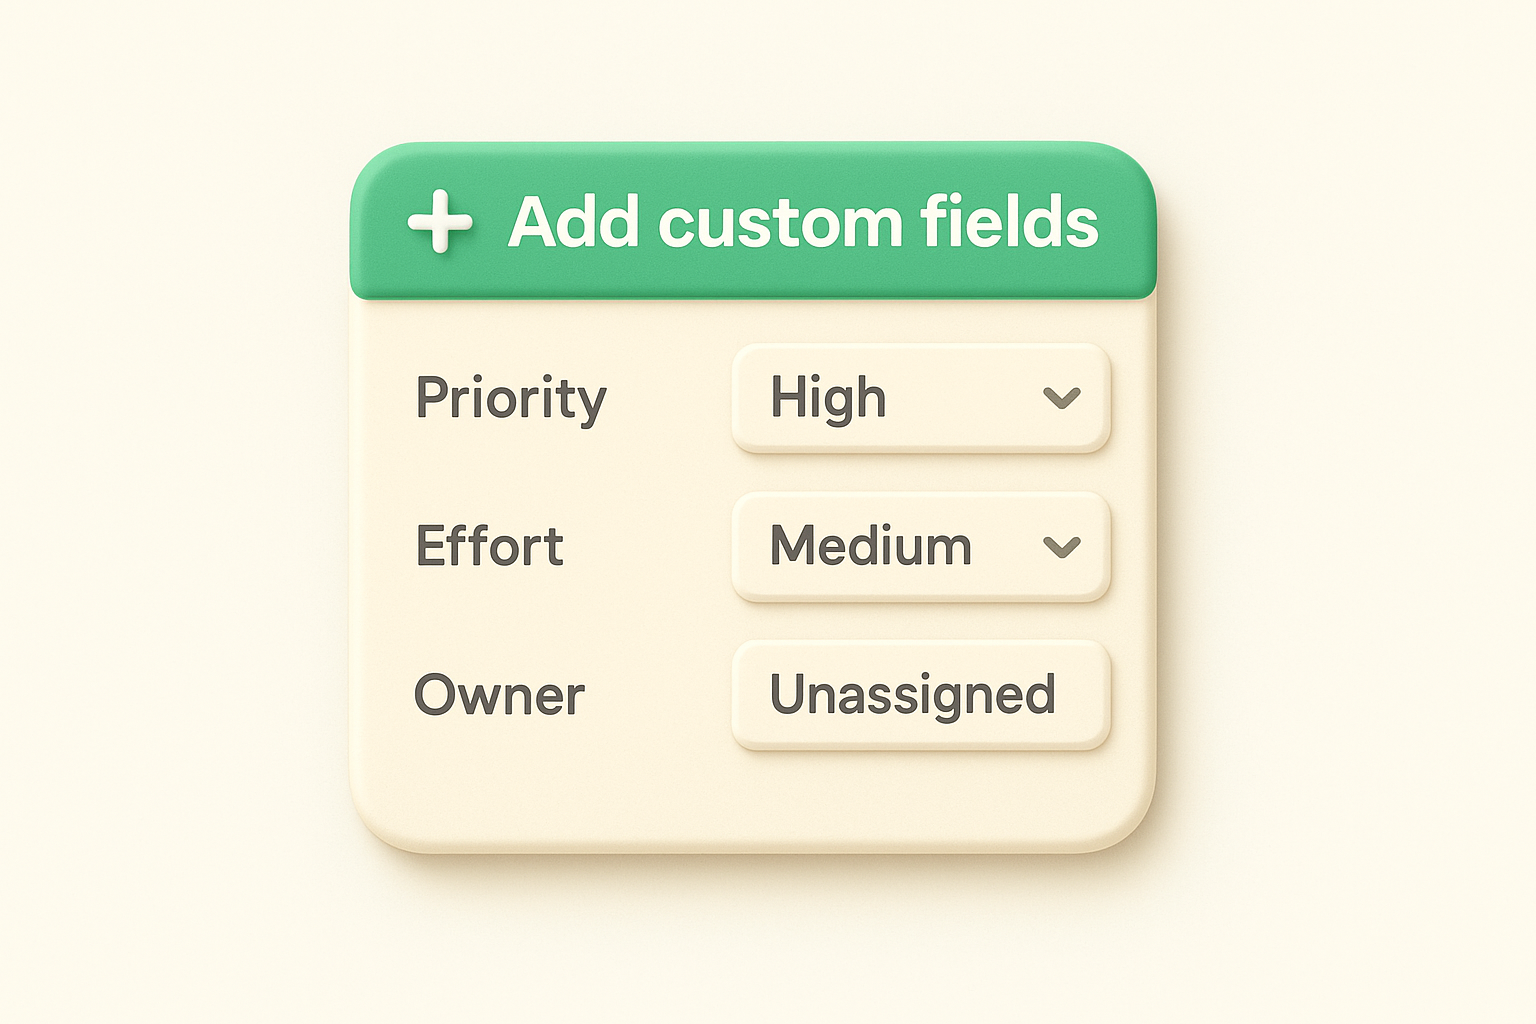
Structure your fields to accept only predefined options rather than free-form text. Dropdown fields with values like "1-3 days," "1-2 weeks," or "1+ month" for effort estimates prevent inconsistent entries and make it easier to filter cards later. The same approach works for owner fields where you list actual team member names instead of allowing people to type whatever they want.
Here's a basic custom field setup for product roadmaps:
| Field Name | Type | Options |
|---|---|---|
| Priority | Dropdown | Critical, High, Medium, Low |
| Effort | Dropdown | Small, Medium, Large |
| Owner | Dropdown | [Team member names] |
| Quarter | Dropdown | Q1 2026, Q2 2026, Q3 2026 |
Navigate to Automation in the board menu and create rules that enforce your card standards automatically. Set up a rule that adds a specific label when you move a card to the "In Development" list, or one that posts a comment asking for effort estimation when cards lack that custom field. These automations reduce manual work and ensure consistency across all cards without requiring constant vigilance.
Build simple rules first before creating complex workflows. A rule like "When a card is added to the 'Next Quarter' list, set the Owner field to unassigned" helps you catch missing assignments early. Another useful rule is "When the Priority field changes to Critical, move the card to the top of its list" to keep urgent items visible.
Your trello product roadmap template becomes valuable only when the right people can access it and contribute to it. Sharing the board requires choosing appropriate permission levels, setting up feedback mechanisms, and establishing a maintenance routine that keeps information current. A roadmap that sits hidden or goes stale loses credibility fast, so you need systems that make collaboration and updates part of your regular workflow.
Click the Share button in the top right corner of your board and add team members, stakeholders, and anyone who needs roadmap visibility. Set each person's permission level based on their role: give Observer access to executives who just need to see progress, Normal access to team members who need to comment and move cards, and Admin access only to the people managing the board. This prevents accidental changes while keeping information accessible.
Use the board visibility setting to control broader access. Set it to "Team" if only your organization should see it, "Organization" if everyone in your company needs access, or "Public" if you want external stakeholders like customers or investors to view progress. Remember that public boards expose everything, so remove any sensitive information about pricing, customer names, or unreleased features before making the board visible outside your organization.
The right permission structure prevents chaos from too many editors while ensuring everyone who needs roadmap visibility can access it.
Add a dedicated "Feedback" list to your board where stakeholders can drop ideas and requests. Set up a Butler rule that automatically labels new cards in this list with "Needs Review" so you don't miss incoming suggestions. This creates a clear place for input without cluttering your main roadmap lists with unvetted ideas.
Enable commenting on existing cards and encourage stakeholders to add context about why features matter to them. Comments capture the reasoning behind requests, which helps during prioritization. You can also use the voting Power-Up to let stakeholders upvote features they care about most, though this works better with internal teams than external audiences.
Schedule a weekly review of your board to move cards between lists, update custom fields, and archive completed work. Set a recurring calendar event that reminds you to spend 15-20 minutes maintaining the board, because roadmaps that sit unchanged for weeks lose stakeholder trust. During each review, move shipped features to a "Completed" list rather than deleting them, which maintains a visible record of progress.
Update card descriptions when scope changes or new information emerges about features. Add comments explaining status changes so stakeholders understand why something moved from "Next Quarter" to "Backlog" or vice versa. This transparency prevents confusion and shows you're actively managing priorities based on real conditions rather than letting the roadmap drift.
You now have everything you need to set up a functional trello product roadmap template that keeps features organized and stakeholders informed. The structure you built creates visual clarity around what's shipping and when, while your labels, fields, and automation rules maintain consistency without manual overhead.
Your roadmap will work best when you treat it as a living document that evolves with your product priorities. Regular updates and stakeholder engagement turn the board from a static plan into an active communication tool that drives alignment across your team.
If you find yourself spending more time managing feedback requests than building features, or if your roadmap needs direct input from users, consider a dedicated solution. Koala Feedback centralizes feature requests, lets users vote on priorities, and automatically connects feedback to your roadmap. This feedback-driven approach helps you build what users actually want, not just what you think they need.

Start today and have your feedback portal up and running in minutes.