Managing feature requests in Jira can quickly turn into chaos without a clear workflow. A well-designed jira feature request workflow helps your team capture user ideas, evaluate them consistently, and move the best ones into development. But setting one up from scratch? That's where most teams stumble.
This guide walks you through the practical steps to configure a feature request workflow in Jira, from creating custom issue types and statuses to setting up automation rules that prevent requests from getting buried. You'll also find real-world examples you can adapt for your own setup.
At Koala Feedback, we help product teams collect and prioritize user feedback before it reaches their development tools. Whether you're using Jira as your primary feature tracking system or feeding validated requests into it from a dedicated feedback portal, understanding how to structure these workflows will save you hours of manual sorting and keep your roadmap focused on what users actually want.
You need to define what success looks like and who participates before you open Jira and start clicking. Most teams skip this step and end up with a workflow that either tracks everything or nothing useful. Your feature request process needs clear boundaries, roles, and decision criteria that align with your product strategy.
Start by writing down three questions that your workflow must answer: Where do feature requests come from? Who evaluates and prioritizes them? How do you communicate decisions back to stakeholders? These questions shape every field, status, and automation rule you'll configure later.
A workflow without defined scope becomes a dumping ground where every bug, support ticket, and half-formed idea gets labeled as a feature request.
Your workflow needs distinct roles with clear permissions. Internal teams (sales, support, customer success) typically submit requests on behalf of users, while product managers and engineering leads make prioritization decisions. You might also allow select customers or partners to submit directly through a portal.
Map out which teams can create feature request issues, who receives notifications, and who has authority to move requests between stages. For example, your support team might create requests but only product managers can mark them as "Approved" or "In Development." This prevents well-meaning teammates from bypassing your prioritization process.
You need concrete criteria to separate genuine feature requests from bugs, technical debt, or support questions. A feature request introduces new functionality or significantly changes existing behavior. It requires planning, design work, and cross-team collaboration.
Create a simple checklist that your team uses during intake:
| Criteria | Feature Request | Not a Feature Request |
|---|---|---|
| Impact | Adds new capability or workflow | Fixes broken existing functionality |
| Scope | Requires multiple sprints or design work | Can be resolved in a single bug fix |
| User need | Addresses a documented customer request | Internal technical improvement |
| Decision required | Needs prioritization against roadmap | Should be handled immediately |
Document these boundaries in your Jira project description and reference them when training new team members. This clarity prevents your jira feature request workflow from becoming cluttered with issues that belong in your bug tracker or support queue.
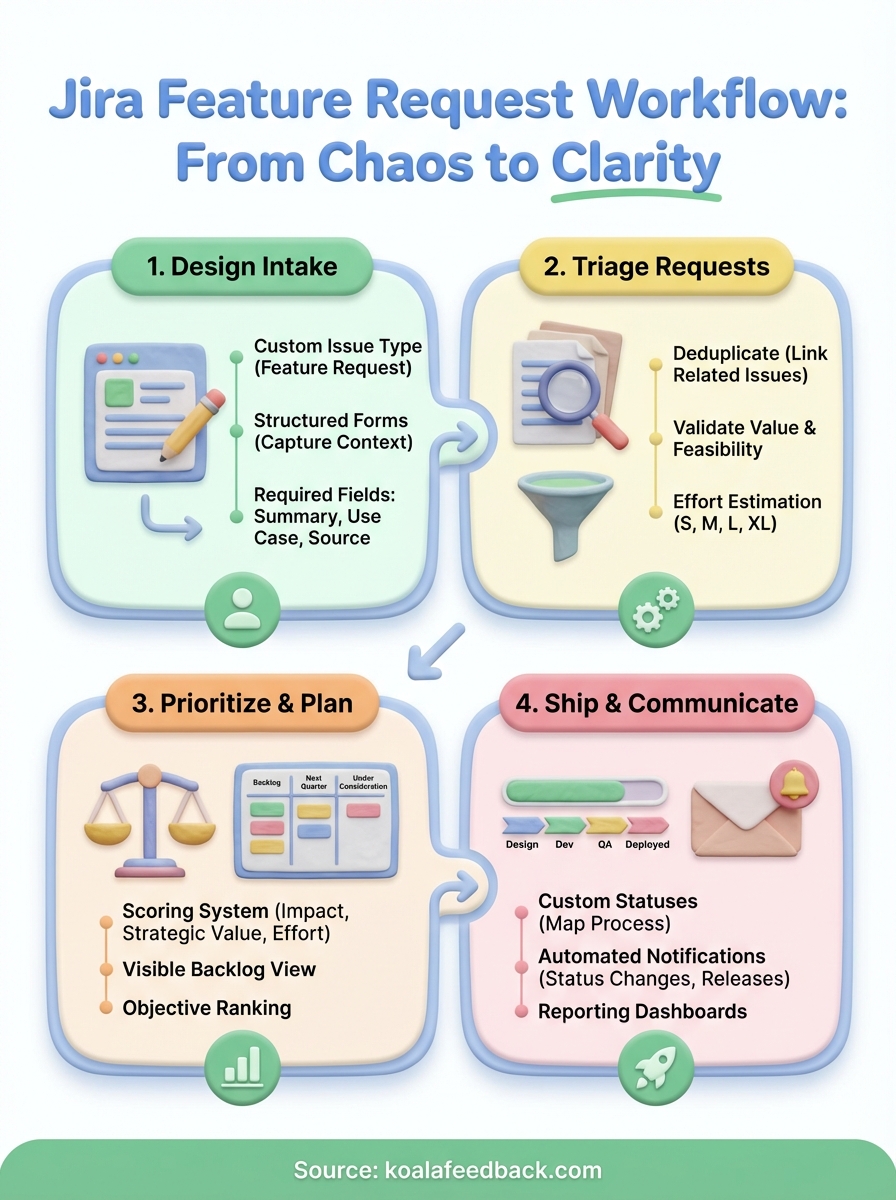
Your jira feature request workflow starts with how requests enter the system. You need a dedicated issue type and a structured form that captures the right information upfront. Without this foundation, your team will waste time chasing down missing context or manually sorting legitimate requests from random ideas.
Navigate to Project settings > Issue types and add a new issue type called "Feature Request" with a distinct icon. This separates feature requests from tasks, bugs, and stories in your backlog. You'll also need to associate this issue type with your project's workflow scheme so it follows the correct status progression.
Set permissions so that anyone in designated groups (support, sales, customer success) can create this issue type. Keep the default fields minimal at first: summary, description, reporter, and priority. You can always add custom fields later based on what your team actually uses during prioritization.
Go to Project settings > Forms and create a new intake form linked to your Feature Request issue type. Your form should capture who wants the feature (customer name or internal team), why they need it (use case), and impact if not delivered (lost revenue, blocked workflow).
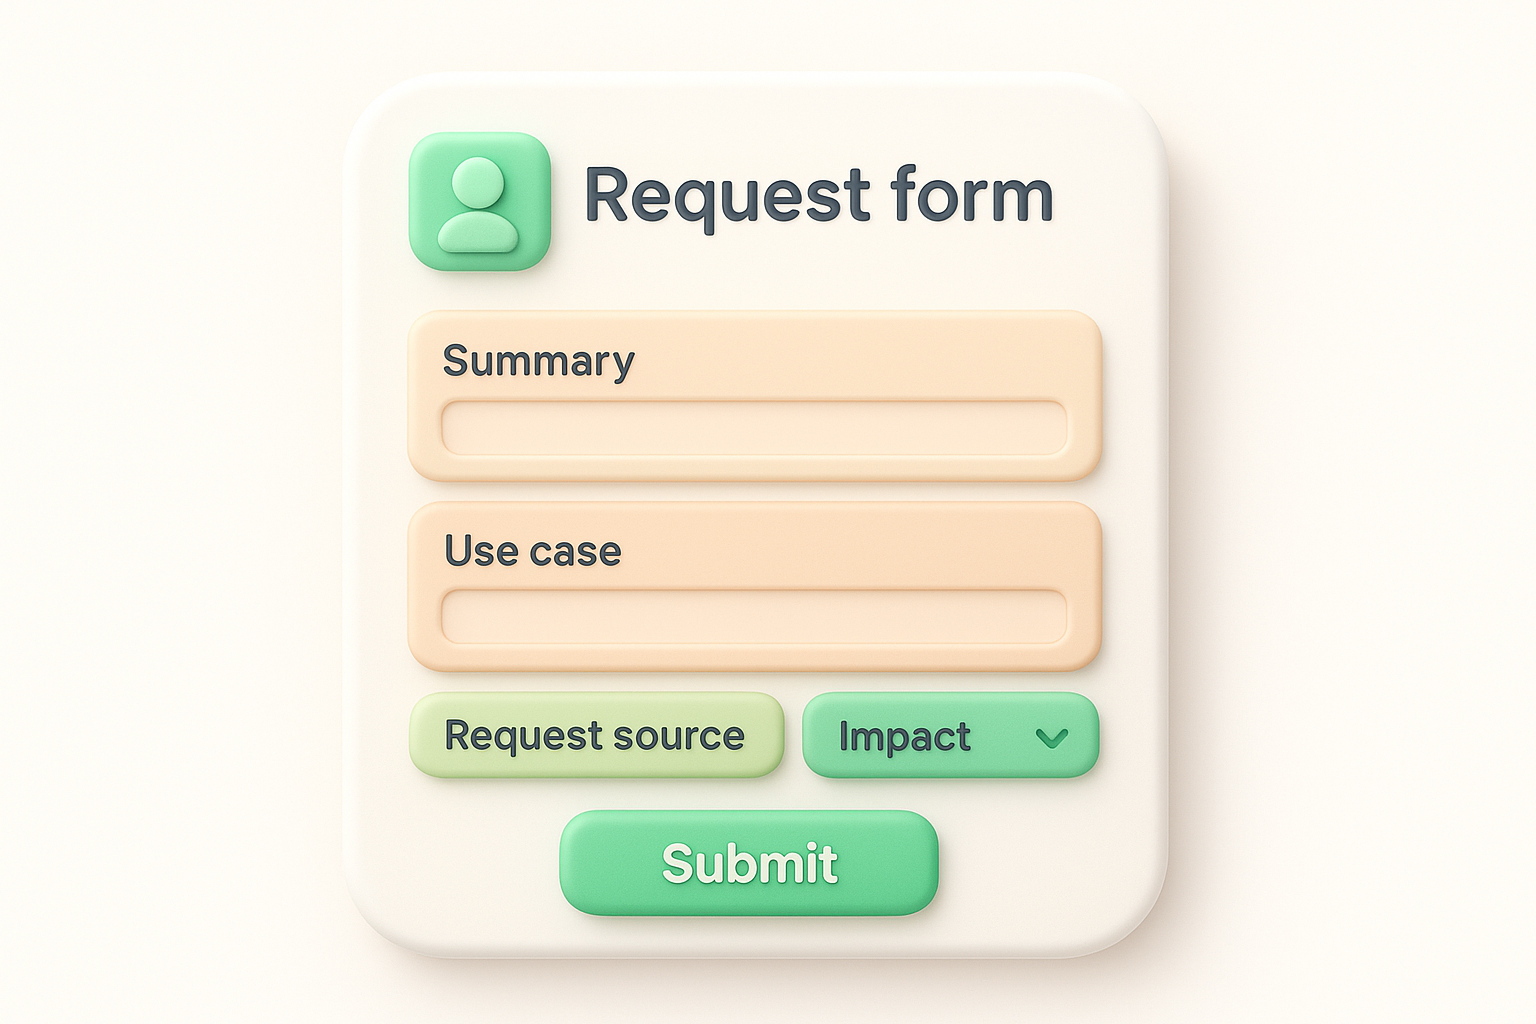
A form that requires too much detail upfront creates friction. Focus on the three fields that help you decide whether to investigate further.
Make "Summary" and "Use case" required fields, but leave "Impact" optional for initial submissions. Add a dropdown for "Request source" with options like Customer Support, Sales, Internal Team, and Partner. Here's a basic field structure:
| Field Name | Type | Required | Purpose |
|---|---|---|---|
| Summary | Text | Yes | One-line description |
| Use case | Long text | Yes | What the user is trying to accomplish |
| Request source | Dropdown | Yes | Where the request originated |
| Impact | Long text | No | Business consequence if not built |
| Customer name | Text | No | Specific account requesting |
Your jira feature request workflow needs a triage stage that filters incoming requests before they reach your prioritization meeting. This step prevents duplicate work, removes invalid requests, and adds preliminary effort estimates. You should assign one person (typically a product manager or tech lead) to review new requests within 48 hours of submission.
Run a quick search in Jira using keywords from the new request's summary before you create detailed documentation. Look for existing feature requests, in-progress stories, or recently shipped functionality that already addresses the same need. If you find a duplicate, link the new request to the existing issue and add a comment explaining who else wants this feature.
Merging duplicates early prevents your backlog from showing five slightly different versions of the same request, each with different stakeholders attached.
Use Jira's "Link Issue" function to connect related requests with "Relates to" or "Is duplicated by" link types. This creates a paper trail showing demand intensity without cluttering your board with redundant items.
Ask two questions during validation: Does this align with your product strategy, and can your team technically deliver it? Tag an engineer for a rough complexity estimate (small, medium, large) before moving the request forward. This prevents product managers from committing to features that require six months of infrastructure work.
Create a custom field called "Estimated Size" with values of S, M, L, or XL. Add another field for "Strategic Fit" with options like High, Medium, Low, or Not Aligned. Requests marked "Not Aligned" or "XL" need additional executive review before you add them to your prioritization backlog. This two-step validation keeps your pipeline focused on achievable work that matters to your business.
Your validated feature requests need a scoring system and a public backlog view that your entire team can reference during planning meetings. This is where your jira feature request workflow transforms from a collection pile into a decision-making tool. You rank requests by business value, customer impact, and development effort so that your roadmap reflects actual priorities rather than whoever shouted loudest.
Assign numerical scores to each request based on three factors: customer impact (how many users benefit), strategic value (alignment with company goals), and effort (engineering time required). Create custom fields in Jira for each factor with values from 1 to 5, then add a calculated field that produces a weighted priority score.
Here's a practical scoring template you can adapt:
| Factor | Weight | Score Range | Calculation |
|---|---|---|---|
| Customer Impact | 40% | 1-5 | Number of customers affected |
| Strategic Value | 40% | 1-5 | Alignment with quarterly objectives |
| Effort | 20% | 1-5 (inverted) | 5 = quick win, 1 = multi-sprint |
A scoring system removes emotion from prioritization and gives you objective data to defend roadmap decisions to stakeholders.
Create a dedicated board or filter specifically for approved feature requests by going to Boards > Create board and selecting "Scrum" or "Kanban" depending on your team's workflow. Configure your board to show only Feature Request issue types with status "Approved for Review" and sort by your calculated priority score.
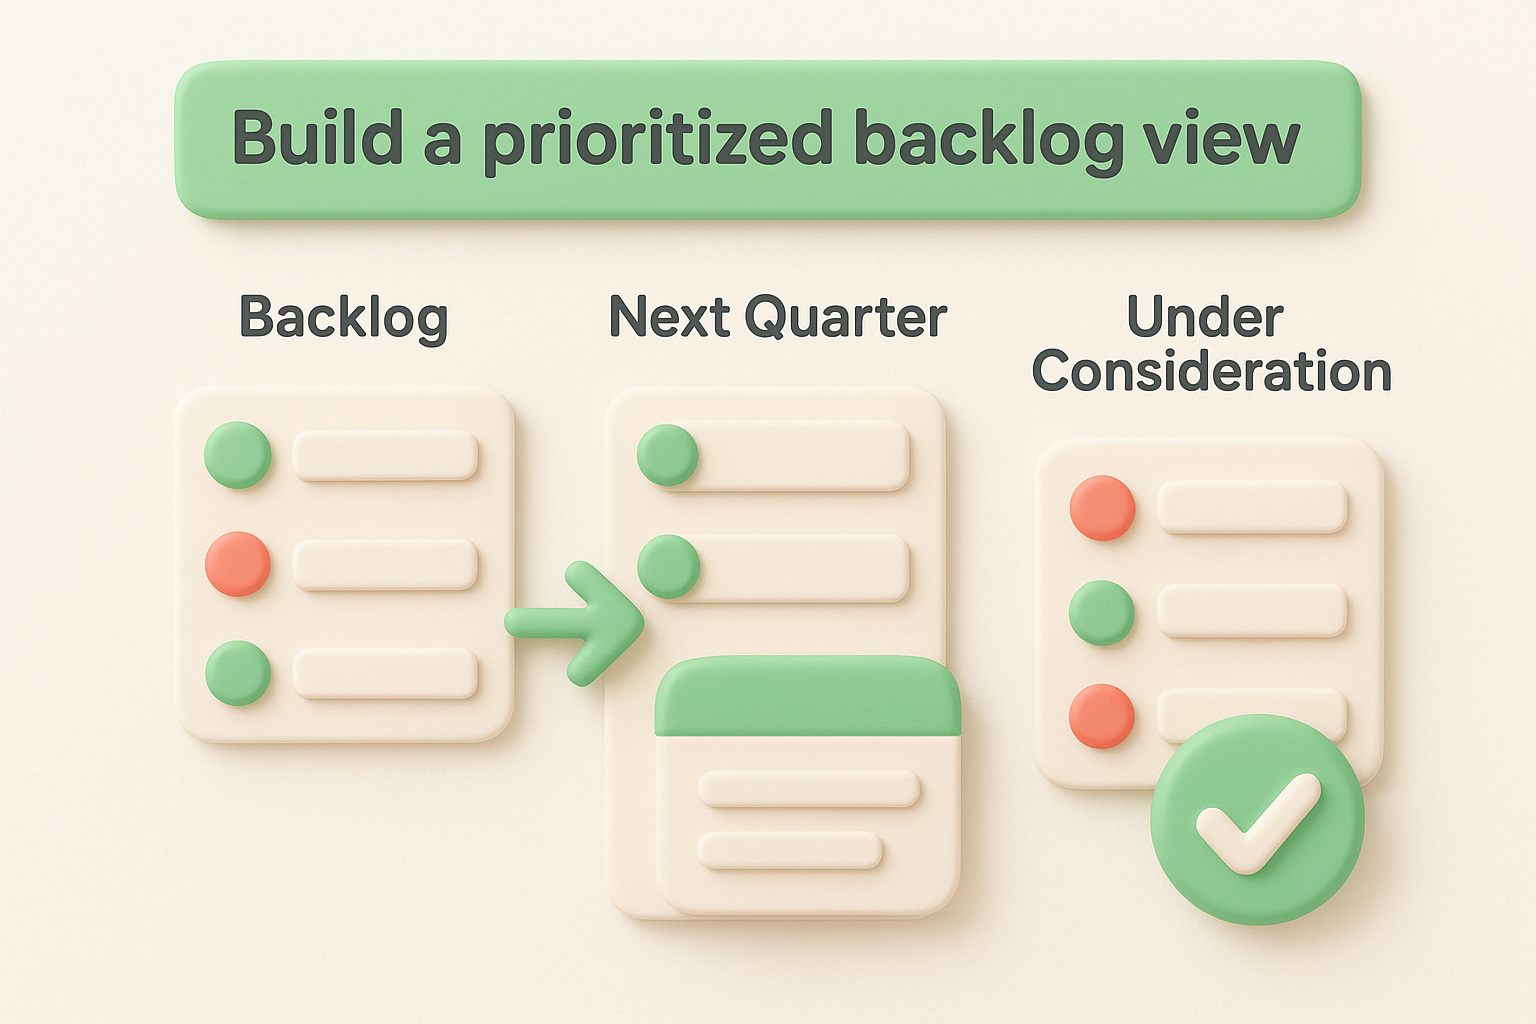
Add columns for "Backlog," "Next Quarter," and "Under Consideration" so product managers can drag requests between planning horizons during roadmap meetings. Set board permissions so engineers and stakeholders can view but only product managers can edit. This transparency helps everyone understand what's coming without allowing uncontrolled scope creep.
Your jira feature request workflow needs clear status transitions and automated notifications that keep stakeholders informed without requiring manual updates. Once a feature moves from backlog to development, you should track its progress through distinct stages and broadcast milestone changes to everyone who requested it. This transparency reduces "when will this ship?" emails and builds trust with internal teams and customers.
Map your development process to custom statuses by going to Project settings > Workflows > Edit workflow. Replace generic states like "In Progress" with stages specific to feature work: "Design Review," "Development," "QA Testing," and "Deployed." Each status should represent a concrete milestone that signals clear progress to non-technical stakeholders.
Add transitions between statuses with required fields that force your team to document decisions. For example, moving from "Design Review" to "Development" might require filling in a "Sprint Target" field, while transitioning to "Deployed" requires a "Release Version" number. This creates an audit trail of when features shipped and which release they went into.
Status granularity helps you generate accurate reports on cycle time and identify bottlenecks in your delivery pipeline.
Create automation rules under Project settings > Automation that notify request submitters when their feature changes status. Set up a rule that triggers on status transition to "Deployed" and sends an email to everyone who voted for or commented on that feature request. Include the release version and a link to release notes in your notification template.
Build a dashboard with gadgets showing "Features Shipped This Month" and "Average Days from Request to Deployment" so leadership can track how responsive your team is to customer needs.
Your jira feature request workflow now has a complete structure from intake forms to deployment tracking. You've configured custom issue types, built a scoring system for prioritization, and set up automation rules that keep stakeholders informed without manual work. This foundation prevents requests from disappearing into a black hole while giving your team objective criteria for roadmap decisions.
Start by implementing one stage at a time rather than deploying everything simultaneously. Roll out your intake form first, validate it with a small group of internal submitters, then add scoring and automation once your team adapts to the new process. Monitor which fields actually get used during prioritization meetings and remove anything that collects dust.
If you want to capture and organize user feedback before it reaches Jira, Koala Feedback provides a dedicated portal where customers vote on features and track your roadmap. You can then push validated, high-priority requests into your Jira workflow instead of manually sorting through scattered feedback channels.

Start today and have your feedback portal up and running in minutes.