A Google Sheets product roadmap template gives you a quick, no-cost way to map out your product direction and share it with your team. It's flexible, familiar, and gets the job done, especially when you're just starting out or need something up and running within minutes, not days.
But here's what most templates won't tell you: a spreadsheet roadmap works great until your product grows. Once you're juggling feedback from dozens (or hundreds) of users, keeping a Google Sheet updated becomes a chore. That's exactly the problem we built Koala Feedback to solve, giving you a centralized place to collect user feedback, prioritize features, and share a public roadmap that stays current without manual copy-pasting.
Still, you have to start somewhere. This guide walks you through building a product roadmap template in Google Sheets from scratch, step by step, with practical tips on structure, formatting, and customization. You'll also learn when it makes sense to stick with a spreadsheet and when you might want to level up to a dedicated tool.
Before you open a blank spreadsheet and start typing, spend five minutes gathering your inputs. Building a Google Sheets product roadmap template without the right information upfront means you'll either stall halfway through or rebuild the whole thing from scratch after your first stakeholder review. A little preparation upfront saves a lot of rework later, and the steps in this guide will go much faster if you arrive with your data ready.
You need a Google account to get started, which gives you free access to Google Sheets at sheets.google.com. If you plan to share the roadmap with your team, make sure everyone who needs to edit or comment already has access to the shared file before your first sync. Google Sheets handles real-time collaboration natively, so multiple people can work in the same document simultaneously without creating version conflicts or duplicate files.
If your organization runs on Google Workspace, you already have everything you need - no additional software or licenses required.
Beyond Google Sheets itself, have these ready before you start:
No paid add-ons or third-party plugins are required. The native Google Sheets feature set covers everything in this guide.
The most common mistake people make when setting up a Google Sheets product roadmap template is jumping straight into formatting before they know what they're actually tracking. Pull together your existing feature list, backlog, or planning notes before you touch the spreadsheet. Even a rough list in a notes app or text file is enough to get started.
Specifically, collect answers to these questions for each item you plan to track:
| Field | What to capture |
|---|---|
| Feature or initiative name | A short, clear label for the item |
| Owner | The person or team responsible |
| Priority | High, medium, or low |
| Target timeline | A quarter, month, or sprint |
| Current status | Not started, in progress, or complete |
You don't need precise answers at this stage. Rough estimates and best guesses are perfectly fine for your first version. The goal is to have enough raw material to populate the roadmap table in Step 2 without stopping mid-build to track down missing information.
If you're working on a brand-new product with no backlog yet, write down your top five to ten planned features and assign each one a rough quarter. That small list gives you enough data to build a working roadmap and practice the structure before you scale it up.
The structure you choose determines how useful your Google Sheets product roadmap template will be in practice. Picking the wrong style means you'll spend more time explaining the roadmap than using it, so match the format to how your team actually plans and communicates.
Three styles work well in Google Sheets, and each fits a different planning context. Review the table below and pick the one that matches how your team talks about the product:
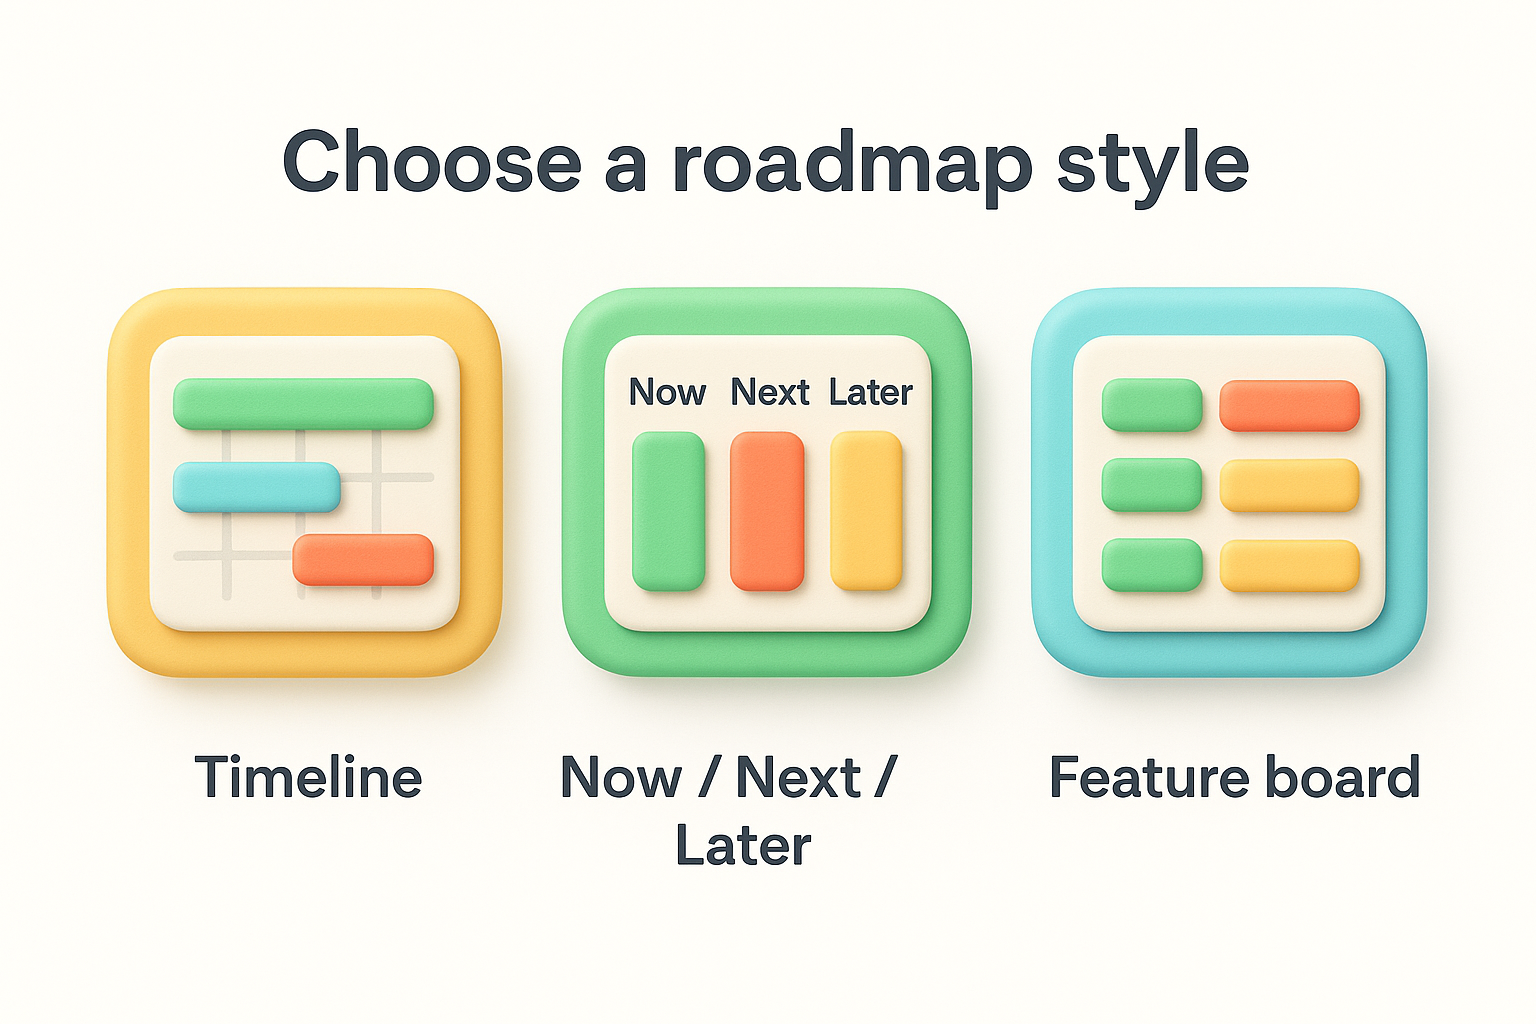
| Style | Best for | How it works |
|---|---|---|
| Timeline (Gantt-style) | Teams with fixed release dates | Rows are features; columns are time periods |
| Now / Next / Later | Early-stage or fast-moving teams | Three columns group features by priority, not date |
| Feature board | Teams organizing by product area | Rows group features under themes or epics |
If you're unsure which style to pick, start with Now / Next / Later. It's the fastest to build and the easiest to update as priorities shift.
A timeline-style roadmap works best when you have committed release dates and need to show progress against a schedule. A Now / Next / Later board works better when dates are still uncertain and you want to communicate priorities without over-promising on delivery timing.
Your time horizon controls how far ahead your roadmap looks and how you label the columns. Quarterly planning (Q1, Q2, Q3, Q4) works well for most product teams because it provides enough structure without demanding a level of precision you don't have yet. Monthly or sprint-based horizons make sense if your team ships frequently and needs a tighter loop between planning and delivery.
Pick one time horizon and stick with it across the entire sheet. Mixing quarters and months in the same column headers makes filtering and sorting unreliable later when you build stakeholder-ready views in Step 4.
With your roadmap style chosen and your raw data ready, open a new Google Sheet and build your base table. The structure you create here becomes the foundation of your entire google sheets product roadmap template, so getting the columns right the first time saves you from reorganizing everything later. Keep the layout simple: one row per feature, one column per data point.
Start on row 1 and type each column header into a separate cell. Bold the entire header row by selecting row 1 and pressing Ctrl+B (or Cmd+B on Mac) so headers stand apart from your data at a glance. Use this column structure as your starting point:
| Column | Header | Purpose |
|---|---|---|
| A | Feature Name | Short label for the item |
| B | Product Area | Theme or epic it belongs to |
| C | Owner | Person or team responsible |
| D | Priority | High, Medium, or Low |
| E | Status | Not Started, In Progress, Complete |
| F | Target Quarter | Q1 2026, Q2 2026, etc. |
| G | Notes | Context or dependencies |
Add or remove columns to match your team's workflow, but always keep Feature Name, Status, and Target Quarter in every version.
Once your headers are in place, freeze row 1 so it stays visible as you scroll through dozens of features. Go to View, then Freeze, then select 1 row. Next, apply alternating row colors by selecting your table range, clicking Format, then Alternating colors, and choosing a light scheme. This single formatting step makes the table much easier to read during stakeholder reviews without adding visual noise.
Fill in your first five to ten rows using the data you collected before you started. Having real entries in the table helps you spot column-width issues and alignment problems early, before you build the dropdowns and conditional formatting in Step 3.
Raw text in a spreadsheet breaks down fast when multiple people update the same column differently. One person types "In Progress," another types "in progress," and a third types "WIP," and now your filters return inconsistent results. Data validation and conditional formatting solve this by locking down how teammates enter information and making status changes visually obvious at a glance without any manual scanning.
Dropdowns force every update to follow the same format, which keeps your google sheets product roadmap template filterable and sortable over time. To add a dropdown to the Status column, select the cells in column E below the header, open the Data menu, and click Data validation. In the panel that opens, set the criteria to "Dropdown" and enter these options: Not Started, In Progress, Complete, On Hold. Click Done and repeat the same steps for column D using: High, Medium, Low.
Lock down your dropdown lists before sharing the sheet with your team so incoming entries stay clean from day one.
Apply the same validation to the Target Quarter column (column F) using a fixed list of your active quarters, for example: Q1 2026, Q2 2026, Q3 2026, Q4 2026. This prevents free-form date entries that break sorting later.
Conditional formatting turns your status column into a visual progress tracker without requiring any extra work during stakeholder reviews. Select the Status column, go to Format, then Conditional formatting. Add one rule per status using these color assignments:
| Status | Fill color |
|---|---|
| Not Started | Light gray |
| In Progress | Light blue |
| Complete | Light green |
| On Hold | Light yellow |
Set each rule to trigger when the cell text equals the matching status label exactly. When you update a row from In Progress to Complete, the row color changes automatically, making progress visible without anyone needing to read through every individual cell.
Your raw table holds all the data your team needs, but a stakeholder review is not the place to scroll through unfiltered rows. This step shows you how to create filtered views and a summary layer that let different audiences see exactly what's relevant to them, without exposing every column or letting anyone accidentally edit the source data.
Google Sheets lets you save named filter views that each apply a different set of filters without changing what other collaborators see. To create one, click the Data menu, select Filter views, then click Create new filter view. Name it clearly, for example "Engineering: Q2 2026" or "Leadership: High Priority." Set the filter criteria for that view, such as filtering column D to show only High priority rows and column F to show only Q2 2026. Save it, and that view becomes available to anyone with access to the file via the same Data > Filter views menu.
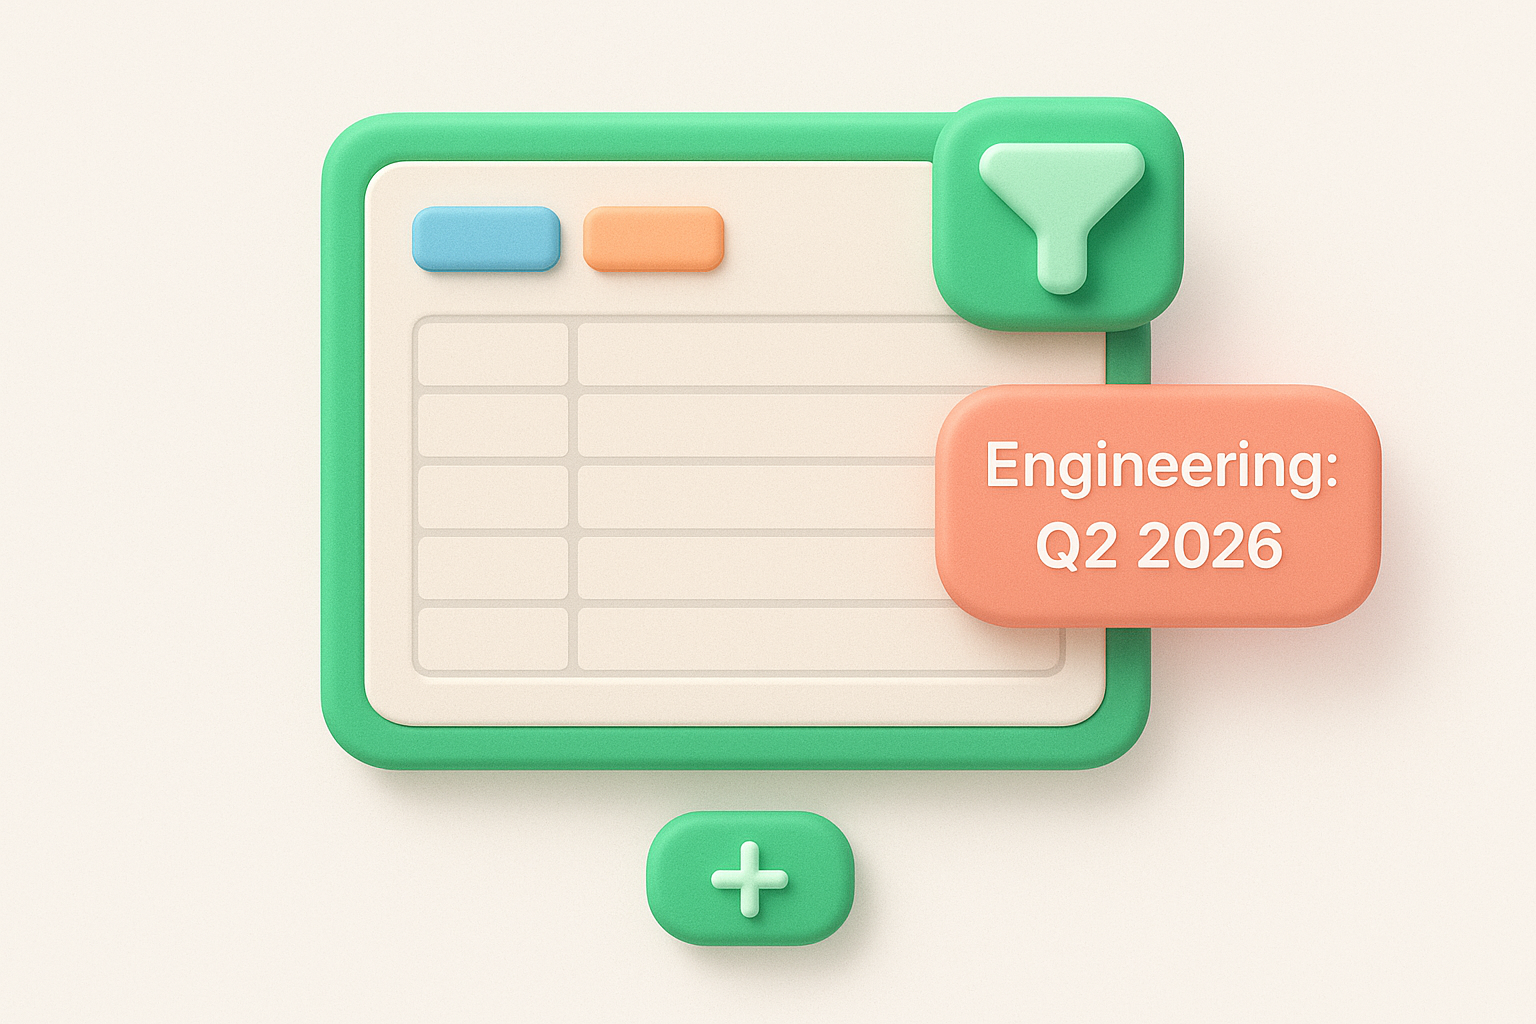
Create at least three named filter views before your first stakeholder sync: one for leadership, one per team, and one showing only completed items.
Repeat this process for each audience. Leadership typically needs a high-priority, current-quarter view, while engineering teams want their own product area filtered with all statuses visible. Named filter views keep your google sheets product roadmap template clean and professional for every group without requiring you to maintain separate spreadsheet copies.
A summary tab pulls live counts from your main table so stakeholders see progress at a glance without digging into the full data. Add a new sheet tab, name it "Summary," and use the QUERY function to count items by status. Paste this formula into cell B2:
=QUERY(Roadmap!A:E, "SELECT E, COUNT(A) WHERE A IS NOT NULL GROUP BY E LABEL COUNT(A) 'Count'", 1)
Replace Roadmap with the exact name of your main sheet tab. This formula automatically updates the count whenever your team changes a status in the source table, giving everyone a current snapshot without any manual work.
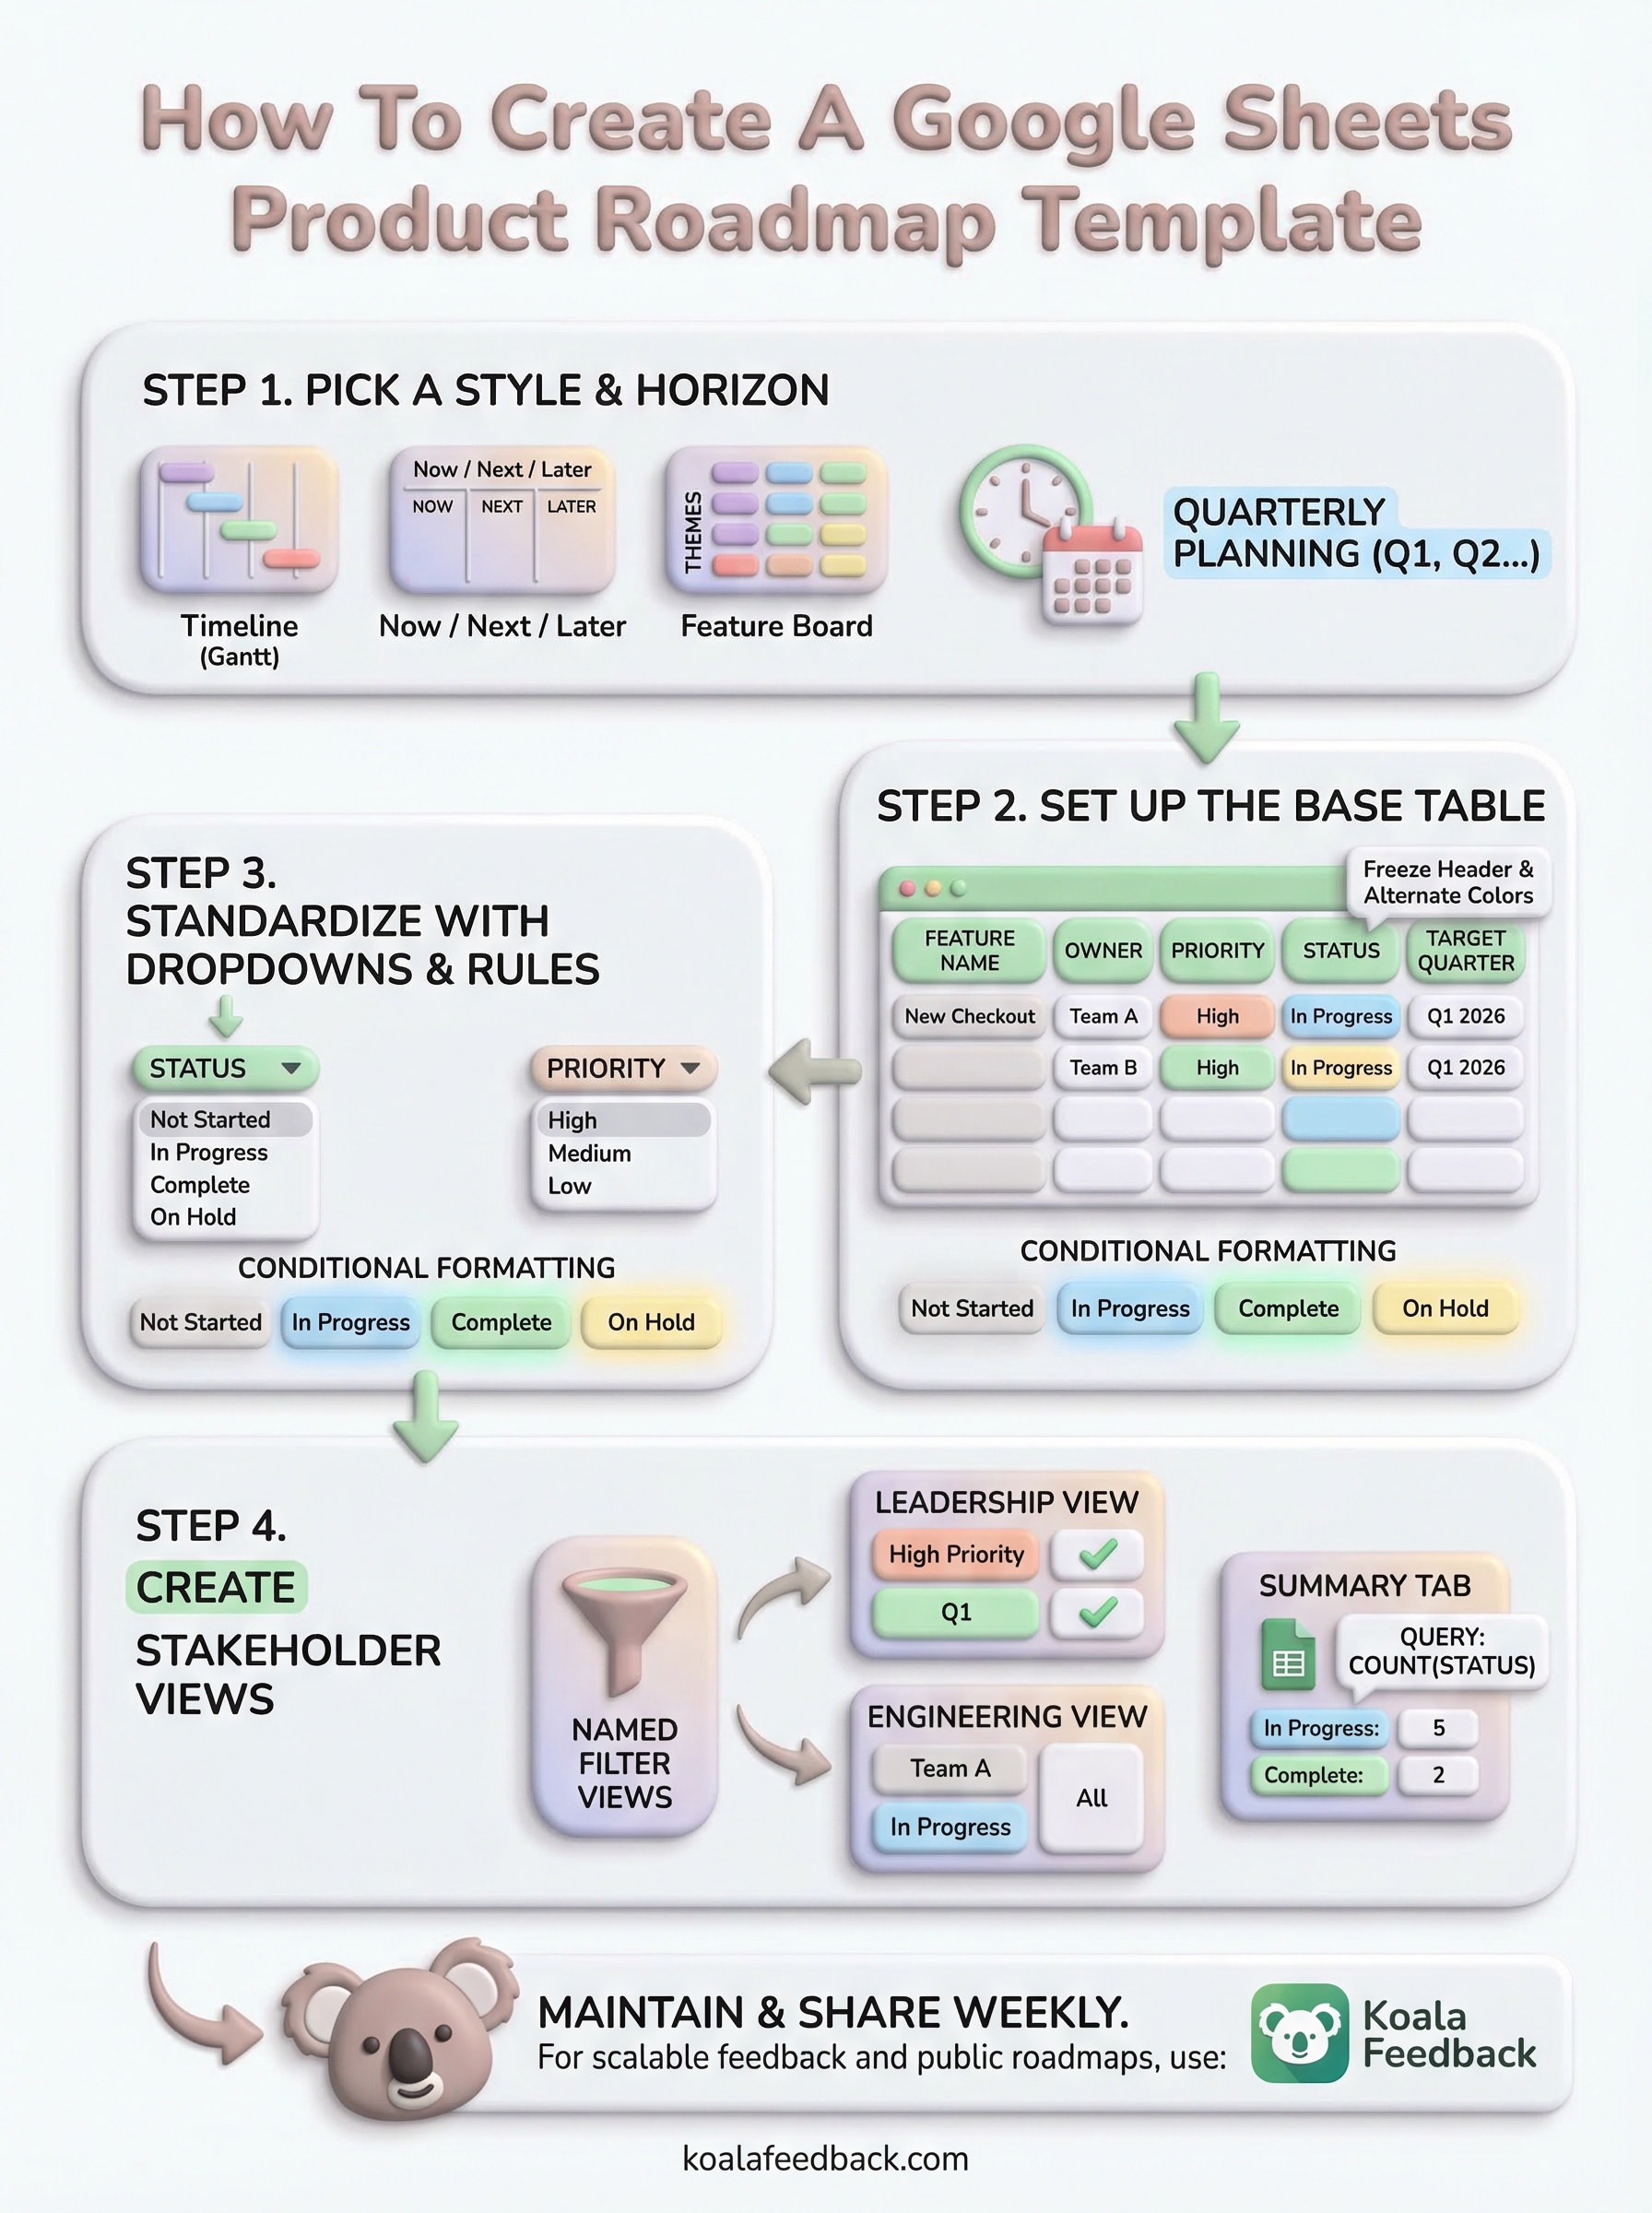
Your google sheets product roadmap template only stays useful if you update it consistently. Block 15 minutes each week to review open items, update statuses, and adjust target quarters when plans shift. Stale data erodes trust faster than any formatting issue, so treat weekly updates as a non-negotiable habit rather than an occasional task.
Sharing the sheet is straightforward: click Share, set the permission to Viewer for stakeholders who only need to read it, and send the link. For larger teams where user feedback constantly reshapes your priorities, a spreadsheet starts to show its limits quickly. Tracking votes, comments, and feature requests across dozens of users in a Google Sheet means constant manual work that pulls your focus away from shipping. If you hit that wall, Koala Feedback gives you a dedicated platform to collect feedback, prioritize features, and publish a live roadmap your users can follow directly.

Start today and have your feedback portal up and running in minutes.