Most product teams don't fail because they build things poorly. They fail because they build the wrong things. A structured user research process helps you avoid that trap by replacing assumptions with actual evidence from the people who use your product.
But knowing you should do research and knowing how to do it are two different problems. Without a clear framework, research efforts tend to stall out, you collect a pile of interview notes or survey responses, then struggle to turn any of it into decisions that move the product forward. That's wasted time and budget, and it often discourages teams from doing research at all. The fix isn't more data. It's a repeatable process that connects every research activity back to a specific goal.
This guide breaks user research down into seven concrete steps, from defining your objectives to translating findings into action. Whether you're a product manager running your first study or a seasoned team looking to tighten your workflow, you'll walk away with a practical framework you can apply immediately. And once you start generating insights, tools like Koala Feedback make it easy to centralize what you learn, capturing ongoing user feedback, prioritizing what matters most, and sharing your product direction through a public roadmap so your users stay in the loop.
The user research process is a structured series of steps that helps product teams gather, analyze, and act on direct input from users. Rather than relying on internal assumptions or gut instinct, it puts real user behavior and motivations at the center of product decisions. At its core, user research bridges the gap between what your team thinks users want and what users actually need.
Not all user research looks the same, and understanding the difference between the two main types helps you choose the right approach for your situation. Qualitative research focuses on the "why" behind user behavior. It includes methods like user interviews, usability tests, and observation sessions, where you collect descriptive data from a smaller group of participants. Quantitative research, on the other hand, focuses on measuring the "what" at scale. Surveys with closed-ended questions, analytics data, and click-through rates all fall into this category.
| Research Type | Goal | Common Methods | Typical Sample Size |
|---|---|---|---|
| Qualitative | Understand motivations and pain points | Interviews, usability testing, field studies | 5–20 participants |
| Quantitative | Measure behavior and frequency | Surveys, analytics, A/B tests | 100+ respondents |
Most effective research programs use both types together. Quantitative data tells you that 40% of users abandon a specific step in your onboarding flow. Qualitative research tells you why they leave.
You can run user research at any stage of the product lifecycle, but certain moments call for it more urgently than others. Before you define or scope a new feature, research helps confirm that the problem is real and worth solving. During design, research surfaces usability issues before they get shipped. After launch, research tells you whether the solution actually worked.
Skipping research at the definition stage is one of the most expensive mistakes a product team can make. Building the wrong thing costs far more than a week of interviews.
Here are the most common triggers that signal it is time to run a study:
Running a formal process rather than ad hoc research gives your team consistent, comparable data across studies. When every research effort follows the same framework, you can track how user needs shift over time, spot recurring pain points, and build institutional knowledge instead of starting from scratch each time. It also makes your findings more credible to stakeholders, since the methodology is documented and reproducible.
Structure also forces clarity before you start collecting data. Teams that skip straight to scheduling interviews often end up with sessions that pull in fifteen different directions because nobody agreed on the question they were actually trying to answer. The steps outlined in this guide solve that problem by front-loading the decisions that matter most, so every interview, survey, or usability session you run produces findings you can act on.
The first two steps of the user research process set the foundation for everything that follows. Getting these right means every hour you spend collecting data connects directly to a decision your team needs to make. Skip them, and you risk generating interesting but useless findings that sit in a document nobody reads.
A research goal is not a topic. "Learn about onboarding" is a topic. A goal is a specific question your team needs to answer before it can move forward. Good research goals are narrow enough to be answerable in a single study and tied directly to a product or business decision.
Use this template to write a goal that holds up:
We want to understand [specific behavior or problem]
so that we can [product decision or action].
For example: "We want to understand why users stop engaging after their first week so that we can redesign the activation sequence." That statement gives you a clear scope, a defined user moment, and a reason the finding matters. Write one to three goals per study. More than that and your sessions lose focus.
If you can't complete the sentence "so that we can…" with a real decision, your goal isn't ready yet.
Your goals determine your methods, not the other way around. If you need to understand the emotional reasons behind a behavior, choose a qualitative approach like user interviews or diary studies. If you need to measure how often something happens across your entire user base, reach for a survey or analytics review.
Here's a quick reference to match goals to methods:
| Goal | Best Method |
|---|---|
| Understand why users churn | In-depth interviews |
| Test if a new UI flow is usable | Moderated usability test |
| Measure feature satisfaction at scale | Quantitative survey |
| Observe real-world usage behavior | Contextual inquiry or diary study |
| Compare two design options | A/B test |
Pick one primary method per study and add a secondary method only if your timeline and budget support it. Running interviews, surveys, and usability tests simultaneously stretches your team thin and produces shallower results across all three. Commit to the method that best answers your stated goal and run it well.
With your goals set and your method chosen, the next phase of the user research process focuses on getting the right people in the room and making sure every session runs smoothly. These two steps sound logistical, but they have a direct impact on the quality of your findings. Poor recruitment skews your data. A weak study plan wastes participants' time and yours.
Your findings are only as good as your participant pool. If you're studying why power users churn, interviewing new signups produces irrelevant data. Before you recruit anyone, write a screener criteria list that defines exactly who qualifies for your study based on your research goals.
Here's a simple screener template you can adapt:
Screener Criteria

Product: [Your product name]
Study type: [Interviews / usability test / survey]

Include participants who:
- [Criterion 1, e.g., "Have used the product for at least 30 days"]
- [Criterion 2, e.g., "Completed the onboarding flow"]
- [Criterion 3, e.g., "Work in a role relevant to the feature being tested"]

Exclude participants who:
- [Exclusion 1, e.g., "Work for a competitor"]
- [Exclusion 2, e.g., "Have participated in a study in the last 90 days"]

Target: [Number of participants, e.g., 8–10 for interviews]
For qualitative studies, five to eight participants typically surface the majority of usability issues and recurring themes. For quantitative surveys, aim for at least 100 responses to get statistically meaningful data. Recruit from your existing user base first by reaching out through email or in-app prompts. If you need participants outside your current users, consider a screened panel through a research service your company already has access to.
Incentivize participation with something meaningful. A $25–$50 gift card for a 45-minute interview is standard practice and increases show rates significantly.
A study plan is a single reference document that outlines every detail of your research before the first session starts. It keeps your team aligned and ensures consistent conditions across all sessions, which makes your findings comparable and defensible when you present them to stakeholders.
Your study plan should cover:
Write the study plan before you start recruiting so you can confirm the logistics are feasible before anyone commits their time.
Running sessions is where the user research process produces its raw material. How you conduct each session determines whether you walk away with genuine insights or surface-level responses that don't hold up during analysis. Preparation from Steps 3 and 4 gives you the structure, but execution in the room, virtual or physical, is what drives the quality of your data.
Your job as a facilitator is to keep the conversation on track without steering participants toward the answers you expect. Start each session by reminding the participant that you're testing the product, not them, and that there are no wrong answers. This small framing reduces social pressure and gets more honest responses.
The most valuable moments in a session often happen when you stop talking and let silence do the work. Participants fill silence by thinking out loud, which reveals reasoning you'd never hear if you jumped to the next question.
Use open-ended questions as your default and follow up with neutral probes like "Tell me more about that" or "What did you expect to happen?" Avoid questions that hint at a preferred answer, such as "Did you find that confusing?" Replace them with "Walk me through what you were thinking at that point."
Taking notes mid-session is harder than it sounds because you're simultaneously listening, facilitating, and observing behavior. The simplest fix is to separate the roles: one person facilitates while another takes notes. If you're running the session solo, record it with the participant's consent and focus on timestamped observations during the session rather than trying to write complete sentences.
Use a structured note template so your observations are consistent across sessions:
Session Notes Template

Participant ID: [P01, P02, etc. - never use real names]
Date:
Session length:
Method: [Interview / Usability test / etc.]

Key observations:
- [Timestamp] [What the participant said or did]
- [Timestamp] [Reaction or behavior worth noting]

Quotes (verbatim):
- "[Direct quote]"

Moments of confusion or friction:
- [Specific point in the session where the participant struggled]

Follow-up questions for analysis:
- [Any thread you want to explore during analysis]
Fill in one template per session and store them in a shared folder your team can access before the analysis phase begins. Consistent structure here makes Step 6 significantly faster.
The final two steps of the user research process are where raw session data becomes decisions your team can act on. Most research stalls here because teams treat analysis as optional or rush it after sessions wrap up. These steps are where the work pays off.
Analysis starts by reviewing all your session notes together, not one at a time. Look for observations that repeat across multiple participants rather than fixating on a single dramatic comment from one person. A pattern that shows up in four out of six interviews carries real weight; an isolated complaint might not.
Use affinity mapping to organize your findings by pulling observations onto a shared board and grouping them into clear, named themes. Here's a straightforward template to structure that work:
Analysis Template

Study: [Study name]
Date completed: [Date]
Method: [Interview / Usability test / etc.]

Themes:
1. [Theme name]
   - Supporting observations: [P01, P03, P05]
   - Representative quote: "[Verbatim quote]"
   - Frequency: [How many participants raised it]

2. [Theme name]
   - Supporting observations: [P02, P04, P06]
   - Representative quote: "[Verbatim quote]"
   - Frequency: [How many participants raised it]

Key finding: [1-2 sentences summarizing what the data shows]
Recommended action: [Specific next step for the product team]
The goal of analysis is not to confirm what you already believed. The findings that challenge your assumptions are the ones most likely to change your product for the better.
Findings that never leave a research document have zero impact. Your job isn't finished when the analysis is complete. You need to present what you learned in a format that makes the recommended action obvious to stakeholders who weren't in the sessions.
Keep your research report to three components: a one-paragraph summary of the key finding, a list of supporting evidence (quotes, observations, frequencies), and a clear recommended action for each theme. Avoid long narrative reports that bury the recommendation on page eight. Put the action item first, then back it up with evidence.
Bring findings into your product planning cycle by linking each insight directly to backlog items or roadmap decisions. Tools like Koala Feedback let you capture ongoing user input alongside your research findings, so the insights your team surfaces stay visible as you prioritize what to build next.
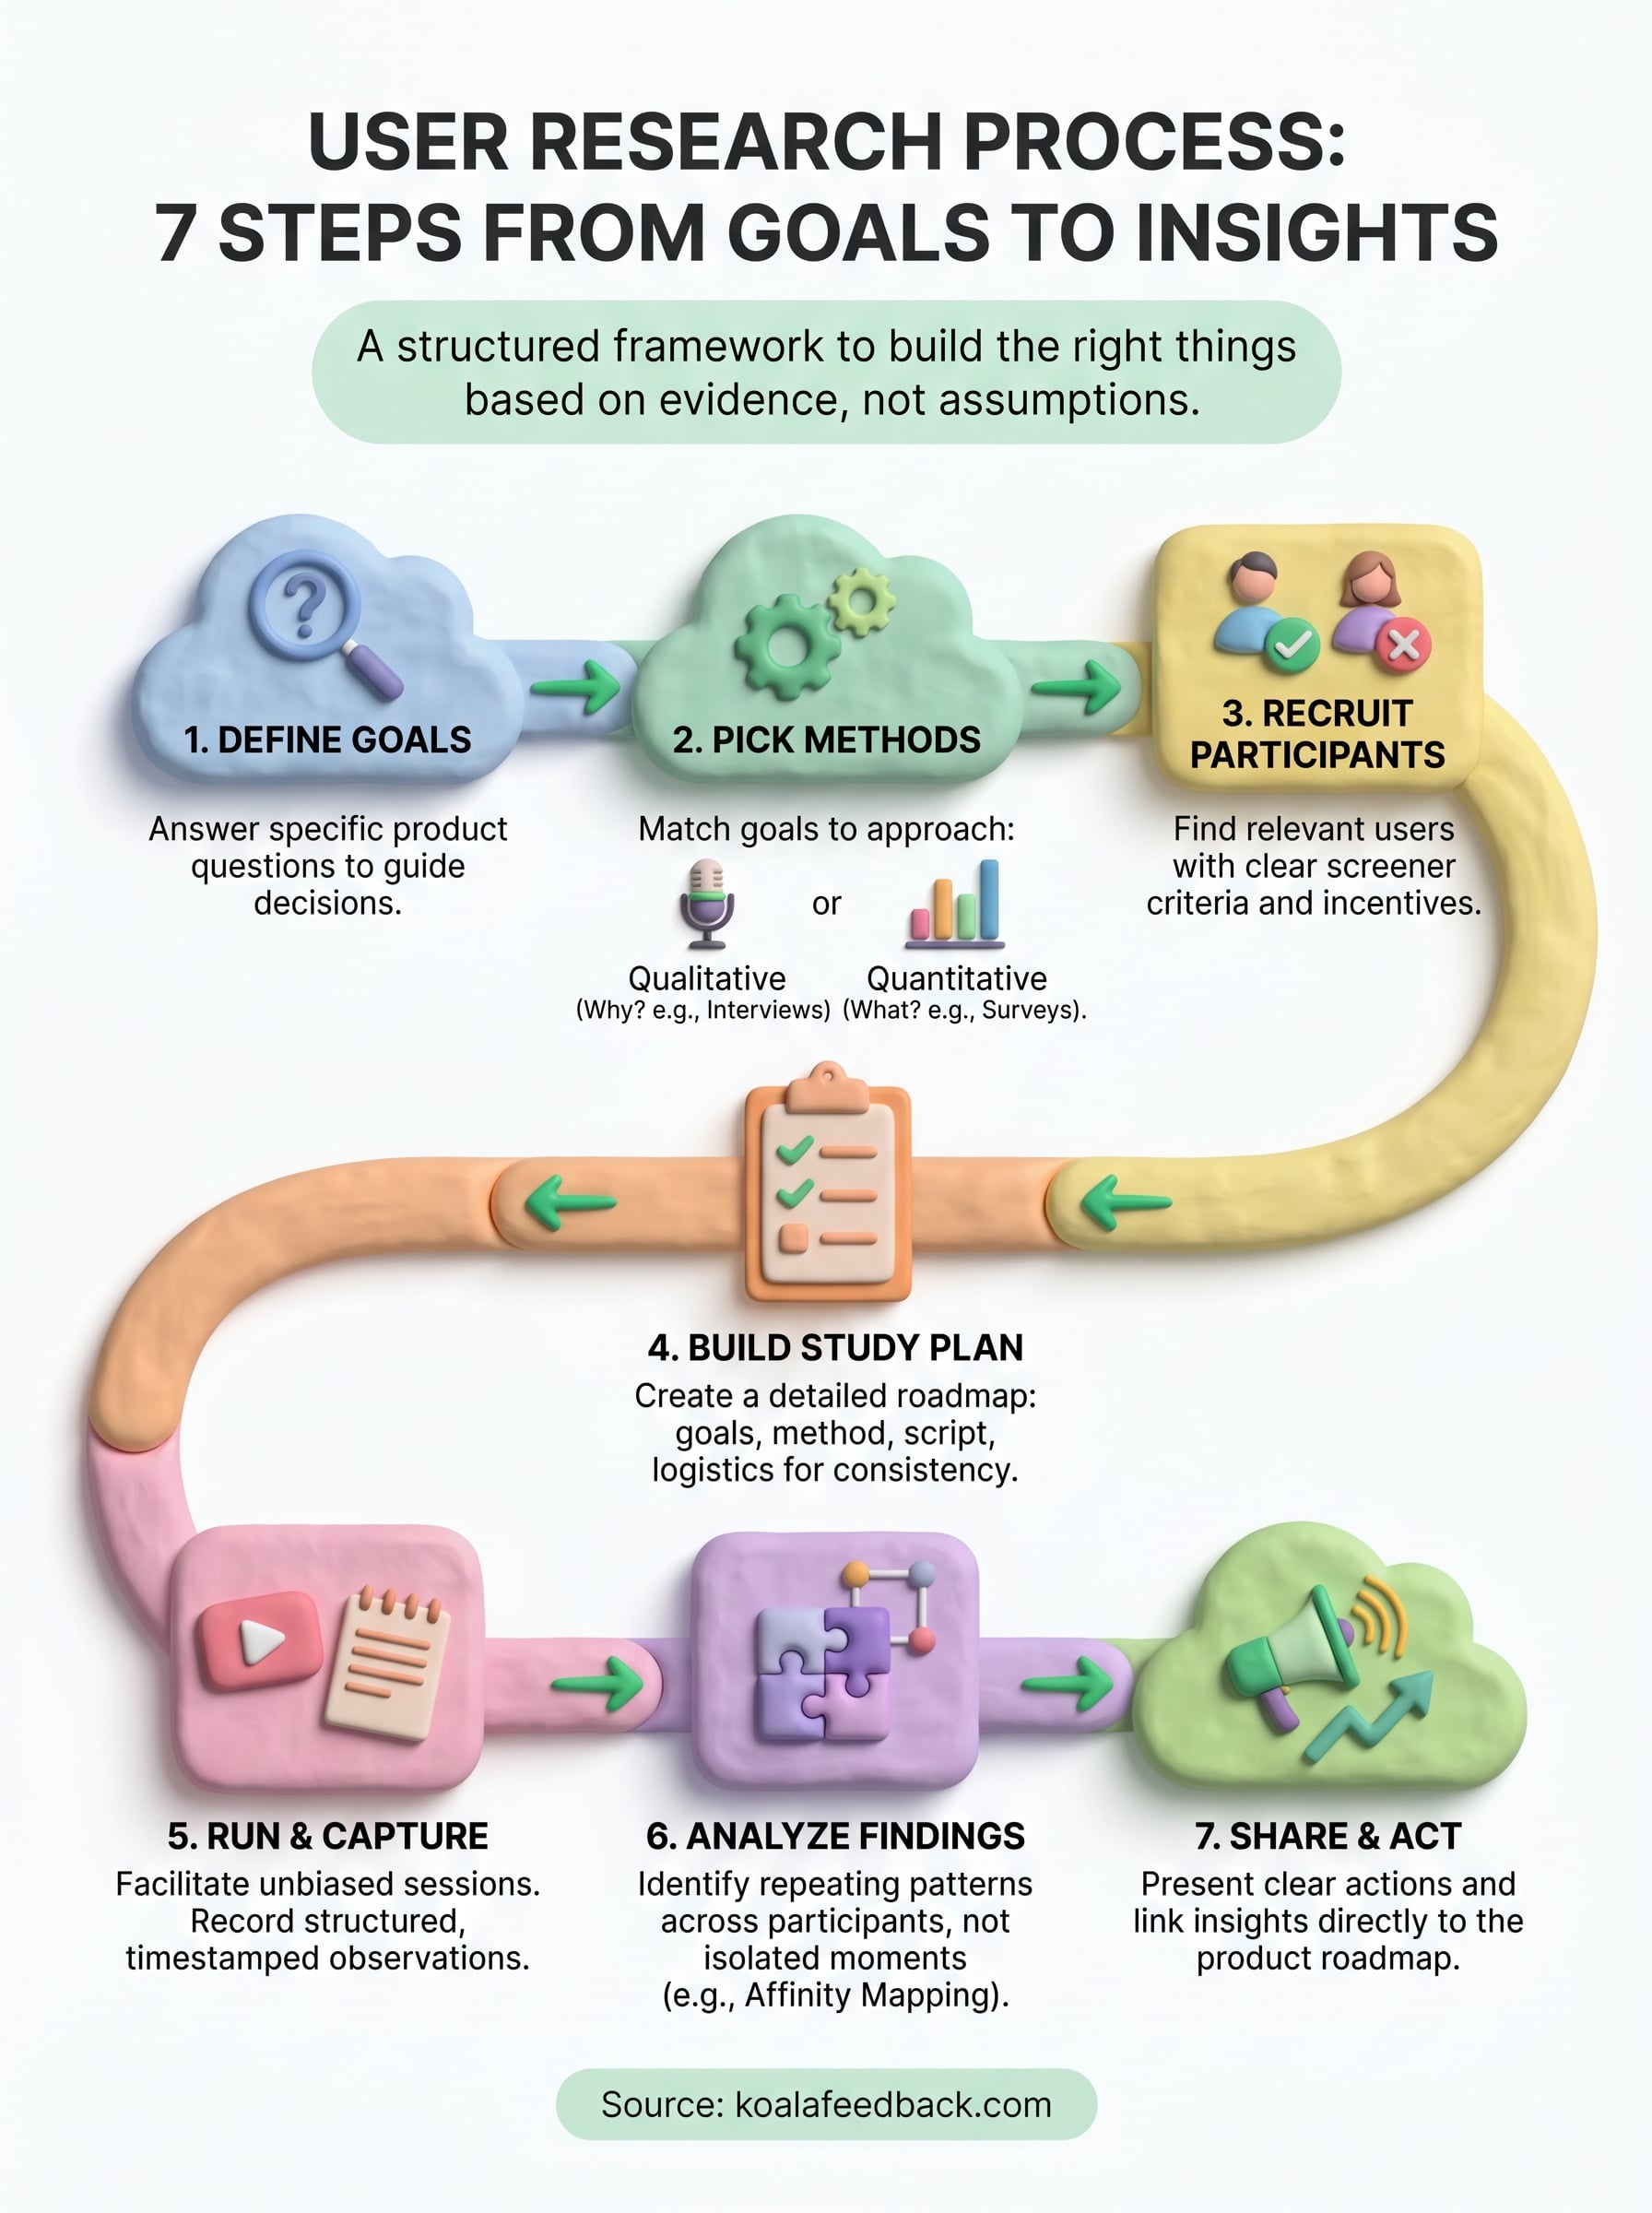
The user research process works when you treat it as a continuous habit, not a one-time project. Teams that run regular, small-scale studies, even two or three interviews per quarter, build far stronger product instincts than teams that wait for a crisis before picking up the phone. Start small, ship your findings quickly, and let each study inform the next one. The seven steps in this guide give you a repeatable framework you can run again and again without rebuilding from scratch each time.
Your biggest barrier to ongoing research isn't budget or time. It's a lack of infrastructure to capture and act on what you learn. When insights from interviews and usability tests feed directly into your prioritization decisions, research earns its place in every sprint cycle. Koala Feedback gives your team a centralized place to collect user input, track feature requests, and share your roadmap, so every stakeholder can see exactly what the research is driving.

Start today and have your feedback portal up and running in minutes.